{{item.name}}
Price: {{currency}}{{item.price| numberThousandsCommas | numberDecimalPoint}}
Qty: {{item.amount}}
By Series
4K Gaming Projectors Home Cinema Series TV Projector Series Portable Projectors Golf Simulator ProjectorsBy Feature
Home Entertainment Best 4K Projectors Best Gaming Projectors Up to 20% World Soccer Promo GV Series Portable Ceiling Projectors House Mapping ProjectorsBy Trending Word
4K UHD (3840×2160) Short Throw 2D, Vertical/Horizontal Keystone LED Laser With Android TV With Low Input LagExplore Commercial Projector
Professional Installation Simulation Projection Small Business Corporation K12 & Higher EducationBy Feature
Photographer Monitors Designer Monitors Best 4K Monitors Best Monitors for MacBook Pro & Mac Best Monitors for Versatile MacBook Users Best Monitors for ProgrammingRemote Work & Learning
Explore treVolo Speaker
Dialogue Speaker for Learning Electrostatic Bluetooth Speaker Carry Case & StandProjectors
Monitors
Lighting
Remote Work & Learning
Interactive Displays | Signage
Store
Mounting a gaming projector to the ceiling may seem daunting at first, but we are here to help make it less intimidating! The projector that we will be mounting today are the X3100i/X3000i gaming projector which is perfect for PS5 and Xbox Series X/S.
If you are currently shopping gaming projectors and seeking guidance on how to choose the right model, consult our Gaming Projector 101 guide for 2022.
Before we get started, there are a few things we need to prepare first:
Tools:
· Drill and drill bit
· Hammer
· Spanner
· Cross screwdriver
· Tape measure or laser level meter
· Ceiling mount
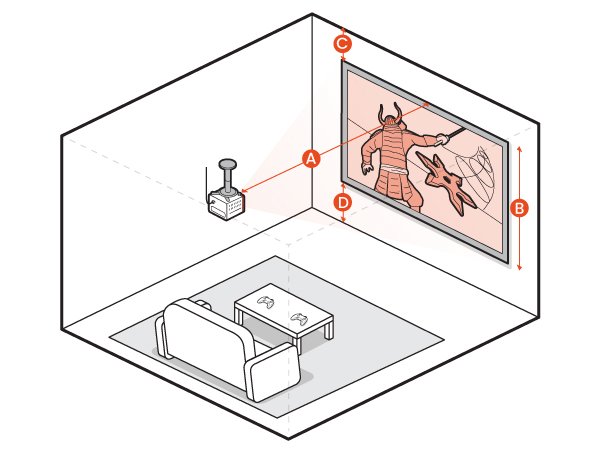
Key Measurements
It’s vital to take accurate measurements so that the projector and screen can fit your room perfectly! The most important measurements to take are:
A. Projector to Screen
B. Screen Height
C. Top of Screen to Ceiling
D. Bottom of the Screen to the Floor
*Tip: Also take note of the room dimensions!
Prepare your room for the projector. First, you want to make sure any objects, such as bookshelves, cabinets, AC units, etc. are not in your way during the process. Be careful to not drill the ceiling mount into any existing utility cables or wires. Double check to make sure that the location of the screen won’t have any constraints, or if you should move furniture to make room for the screen.
Having the right ceiling mount is important so you can support the weight of the intended projector. However, we helped take out all the guesswork for you! Our universal ceiling mount was designed to work with most BenQ projectors under 33 lbs.
Here are some benefits to using our universal ceiling mount:
Browse the ceiling mount user manual for more information!
*Note: the required shift should be decided before mounting, as changing it afterwards requires disassembly and reinstallation.
*Remember to have these projector calculations done beforehand, as you would have to disassemble and reassemble if changes need to be made afterwards.
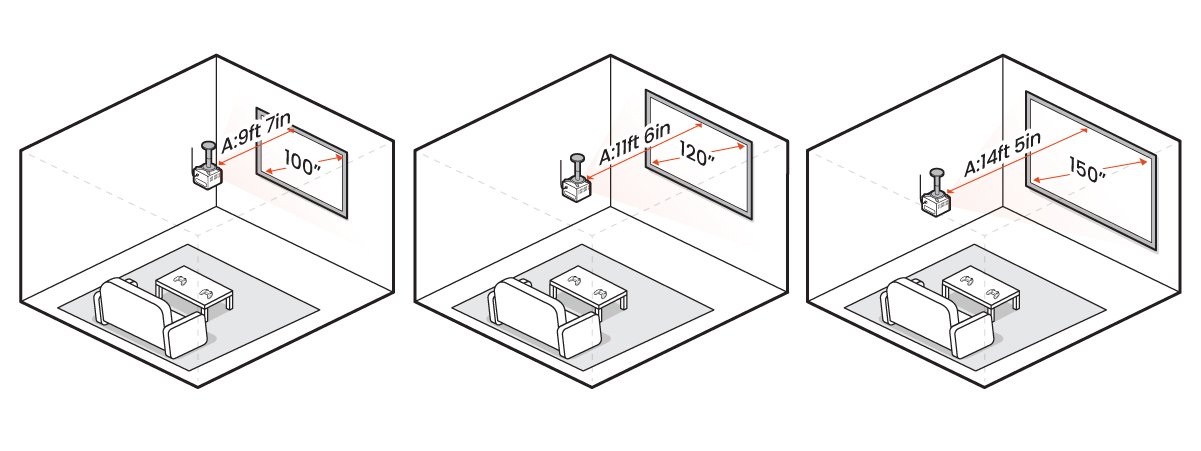
The best viewing distance is based on how comfortable you can see without moving your head. Therefore, it is important to place your projector in a spot that will provide the most comfortable view. Calculate the perfect projection distance and ceiling position by using these:
Something that you should keep in mind of when deciding where to place your projector:
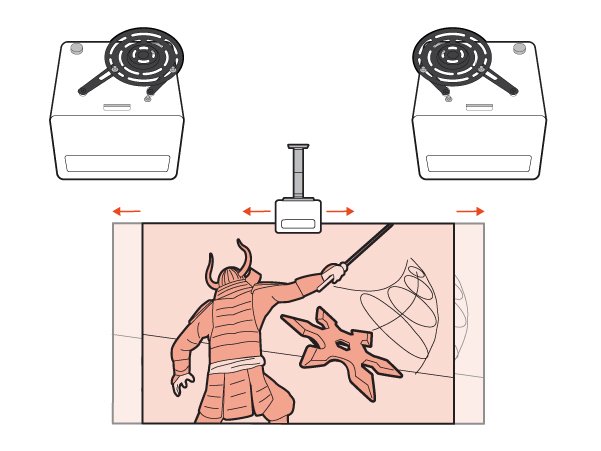
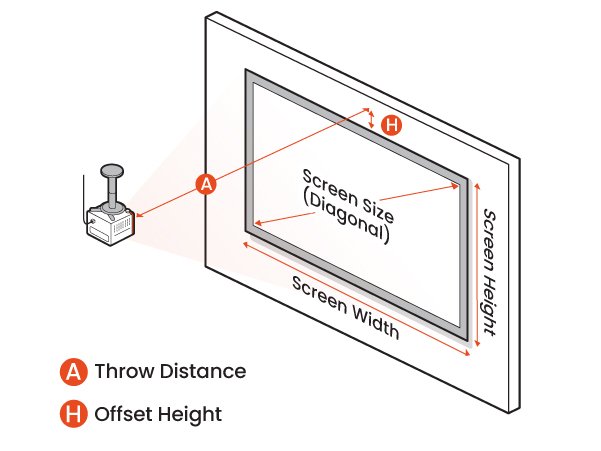
Throw distance and Offset. The design of the projector’s lens and overall optical capabilities determines the ideal throw distance, or projection distance. It also determines the offset height or how much higher the top of the screen lens needs to be. Terms you need to know:
o The X3100i/X3000i has a typical throw ratio of 1.15-1.50.
o Throw ratio = Projection distance (A)/screen width
o The X3100i/X3000i has an offset of 110%.
o Lens offset = (Screen height + Offset height)/ Screen height
See how to calculate the best seat-to-screen distance for your projector, here!
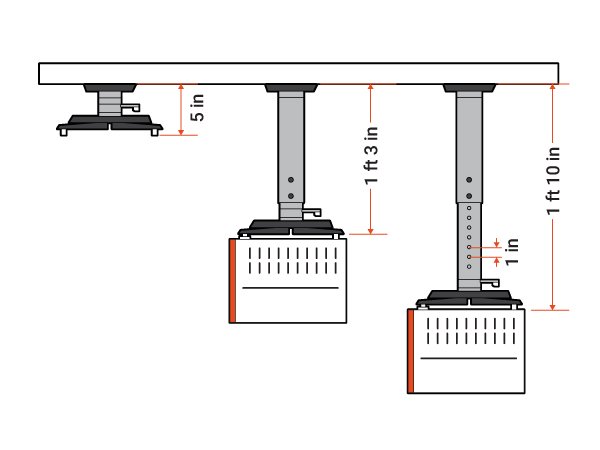
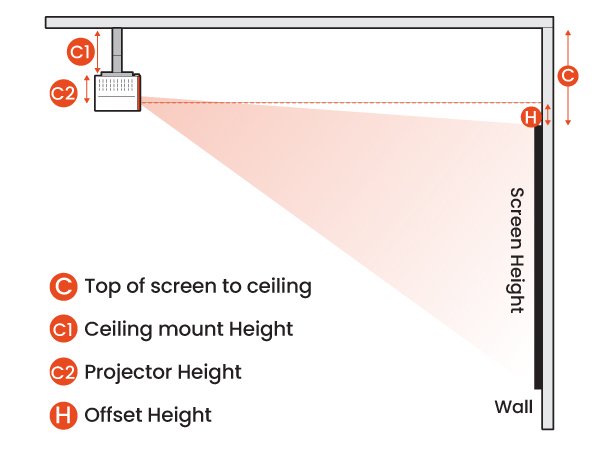
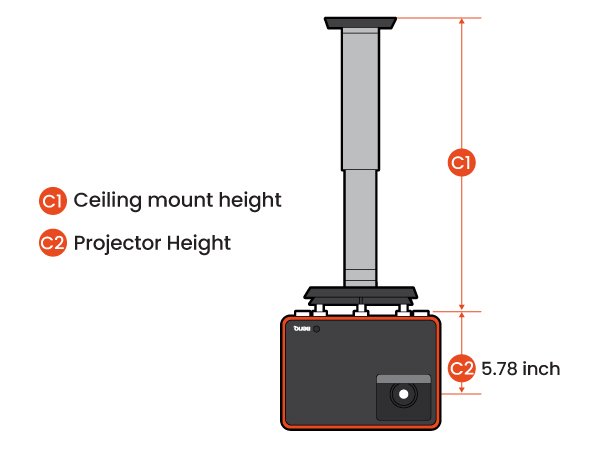
*Note: the ceiling mount height (C1) plus height from the projector’s underside to the center of lens (C2) plus distance from ceiling to center of the lens or offset height (H) may equal ceiling to top of screen clearance.
Next decide on the screen size for your projector. To decide on a gaming projector screen size, accurately measure your room’s ceiling height. Then consider the following factors:
Now let’s choose a screen for your projector. We helped compile a list of recommended projector screens from our trusted partners, Elite Screens, that would be perfect with the X3100i/X3000i in different ambient light conditions.
Aeon Series, thin bezel fixed frame | Matte white material for dark room environments
Sable Frame 2 Series, standard aluminum velvet fixed frame| Matte white material for dark room environments
Aeon Series, thin bezel fixed frame| CineGrey 3D material for rooms with ambient light
Sable Frame, standard aluminum velvet fixed frame| CineGrey 3D material for rooms with ambient light
ezCinema 2, floor pull up portable screen | Matte white material for dark room environments
Learn more tips on how to choose projector screen.
Now we are ready to get started. Here are the main steps to mounting your projector using our universal ceiling mount:
Adjust the tilt or rotation angle if needed, and you’re all set!
If you already have a screen in place and an existing projector setup, compare the throw ratio of your old projector with that of the X3100i/X3000i. Also, compare the distance between each projector’s lens center and center of weight, which is 3 inches for the X3100i/X3000i. Based on these figures, you can determine whether your current ceiling mount and screen needs to be repositioned.
X3000i with our CineGrey 3D ambient light rejecting electric screen
Reviewed by Joelster
X3000i with our StarBright 9 ambient light rejecting fixed frame screen
Reviewed by EBP Man
And find more info about our partners at Elite Screens.
The latest gaming projector discount and set-up tips
{{item.productWordingTag}}
{{currency}}{{item.finalPrice| numberThousandsCommas | numberDecimalPoint}} Save {{currency}}{{item.saveAmount | numberThousandsCommas | numberDecimalPoint}} Save {{item.savePercent | numberThousandsCommas | numberDecimalPoint}}%
new device price{{currency}}{{item.regularPrice| numberThousandsCommas | numberDecimalPoint}}