{{item.name}}
Price: {{currency}}{{item.price| numberThousandsCommas | numberDecimalPoint}}
Qty: {{item.amount}}
Job References
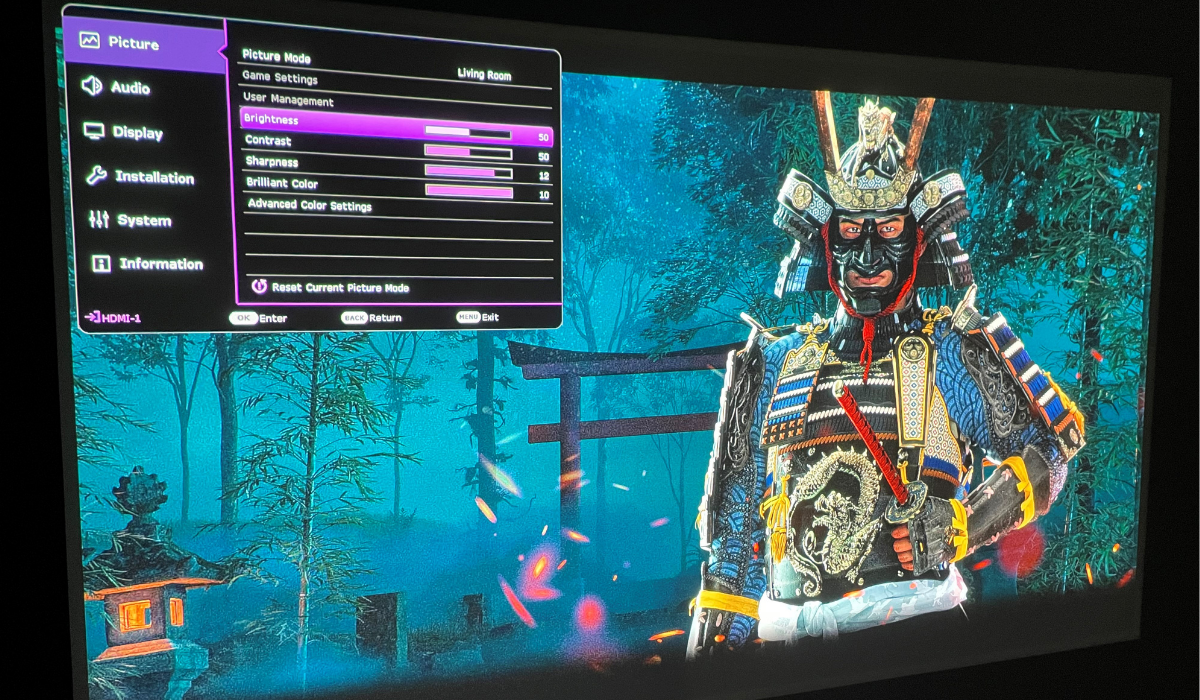
Almost all gaming projectors and projectors in general arrive with pre-calibrated picture modes. This applies most in high end models that go through an extensive image calibration at the factory for major use cases, such as cinema and gaming. The result is that movie mode puts an emphasis on color accuracy, while game mode places low latency above all else.
But sometimes you want to do your own calibration. Sure, you can hire a professional calibrator to come in and set up your projector using all sorts of scientific tools, but that kind of service doesn’t come cheap. Also, even the most meticulous manual calibration may become quite useless if you have too much ambient light where your gaming projector is set up.
In this article we’ll try to help you do your own easy calibration on your gaming projector, while providing tips on how to make sure your settings don’t go to waste due to factors not directly related to the projector.
Before you get started with the calibration proper, here are some things to do:
Now come the main steps.
Once done and satisfied, save the settings you adjusted as User Mode, which means you can always switch to them with a few presses on the remote. And while all of these steps were written with gaming in mind, to be honest games and movies have more and more in common, especially with HDR becoming so important. And so, a well-calibrated gaming mode is just as good at making movie and TV content look great.
The steps we detailed above are for manual calibration using the projector’s settings. But you can start with the calibration tools offered by gaming consoles, and then if the results are still not to your liking, do the projector calibration. Xbox consoles have a Calibrate TV tool under Settings, General, Video & Display Options. The process in this tool works for projectors, as well. On PS5, go to Settings, Screen and Video, then Adjust HDR. There’s no overall calibration tool, only HDR adjustment.
On both Xbox and PlayStation devices, if you find the adjustment tools sufficient and feel the image quality is to your liking, then there’s no need to do further manual calibration on the projector side.
There are a few more things to consider.
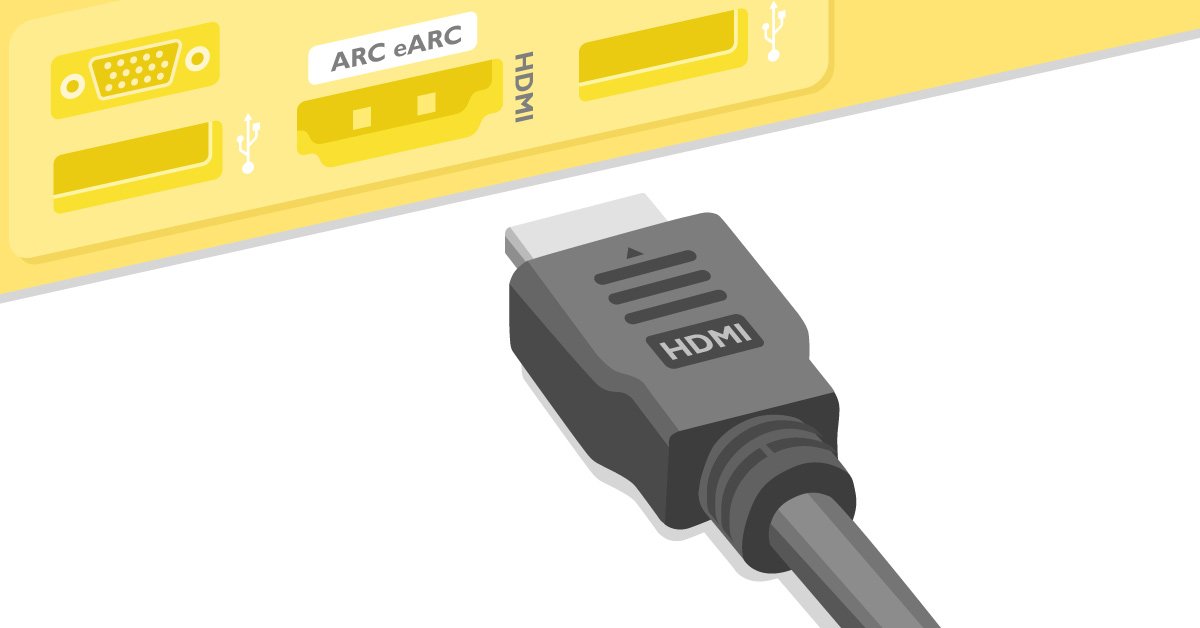
HDMI ports set up for max bandwidth: of high importance is the connection between your gaming projector and consoles. Of course, good projectors operate in HDMI 2.0 and detect your consoles automatically for the maximum bandwidth possible. If you encounter any issues such as flicker, no 4K, or no HDR, make sure to check your projector settings. Many projectors have something like “Enhanced” or “Input Signal Plus” in the HDMI settings portion of their menu, and that needs to be active for ports connected to consoles. If not toggled on, your console will be limited to HDMI 1.4b standards, which max out at 1080p 60Hz or 4K 30Hz, with no HDR support. While HDMI 2.0 should be on automatically when connected to a PS5 or Xbox Series X, it doesn’t hurt to check.
Select a specific game mode if available: really good gaming projectors like the BenQ X3100i don’t just have one overall game mode, but several. These are tailored to genres like first person shooters, sports, and role playing. You can switch between them as needed for the best results, so if you’re someone who plays a lot of COD: Warzone and Elden Ring, for example, you have optimized game modes that cater to both.
Choose the right HDMI port: to get the most bandwidth available when connecting to a PS5 or Xbox Series console, remember to connect directly to your projector via a non-ARC/eARC HDMI port. Those ports are supposed to be connected to external sound systems and may compromise video capabilities by limiting bandwidth and preventing HDR, VRR, or 4K 60Hz from working properly. By the same token, avoid connecting consoles to receivers or other intermediary devices as passthroughs to the projector. PS5 and Xbox Series consoles should be connected directly to your projector. And if your projector has several HDMI ports, connect your console to the ones not labeled ARC/eARC. We have more info on connecting projectors to sound systems if you’re interested.
As games continue to catch up to movies in terms of photorealistic visuals, the importance of image accuracy likewise grows as players want to enjoy the fruits of this progress. And if you have a gaming projector then you’ve already taken the most important step, because nothing does justice to better game graphics like the biggest and most immersive screen format. If you’re thinking of getting a gaming projector, make sure to choose one that has excellent out of the box image fidelity, which saves you a lot of second guessing down the line. Also, do not compromise and give in to the temptation to purchase a cheaper model, as you’ll likely end up with a lower-bandwidth HDMI connection that will bottleneck your consoles and even streaming content. Happy entertainment!
The latest gaming projector discount and set-up tips
{{item.productWordingTag}}
{{currency}}{{item.finalPrice| numberThousandsCommas | numberDecimalPoint}} Save {{currency}}{{item.saveAmount | numberThousandsCommas | numberDecimalPoint}} Save {{item.savePercent | numberThousandsCommas | numberDecimalPoint}}%
new device price{{currency}}{{item.regularPrice| numberThousandsCommas | numberDecimalPoint}}