{{item.name}}
Price: {{currency}}{{item.price| numberThousandsCommas | numberDecimalPoint}}
Qty: {{item.amount}}
By Scenario
Best Projector for World Football Best 4K Projectors Home Entertainment Video Streaming Sports Watching GV Series Portable Ceiling ProjectorsBy Trending Word
4K UHD (3840×2160) Short Throw 2D, Vertical/Horizontal Keystone LED Laser With Android TV With Low Input LagExplore Commercial Projector
Professional Installation Exhibition & Simulation Small Business & Corporation Education Golf Simulator Wireless PresentationIn an earlier article, we talked about the three stages of workflow for photographers and designers, so we have a basic understanding of how color management works in principle. Now, we can take a closer look at how to incorporate ICC profiles in a practical workflow.
The first step in the workflow is content creation, and for photographers it means taking photos with their beloved cameras. If reproducing the original scene is the goal of their work, then some extra precautions should be taken at this stage.
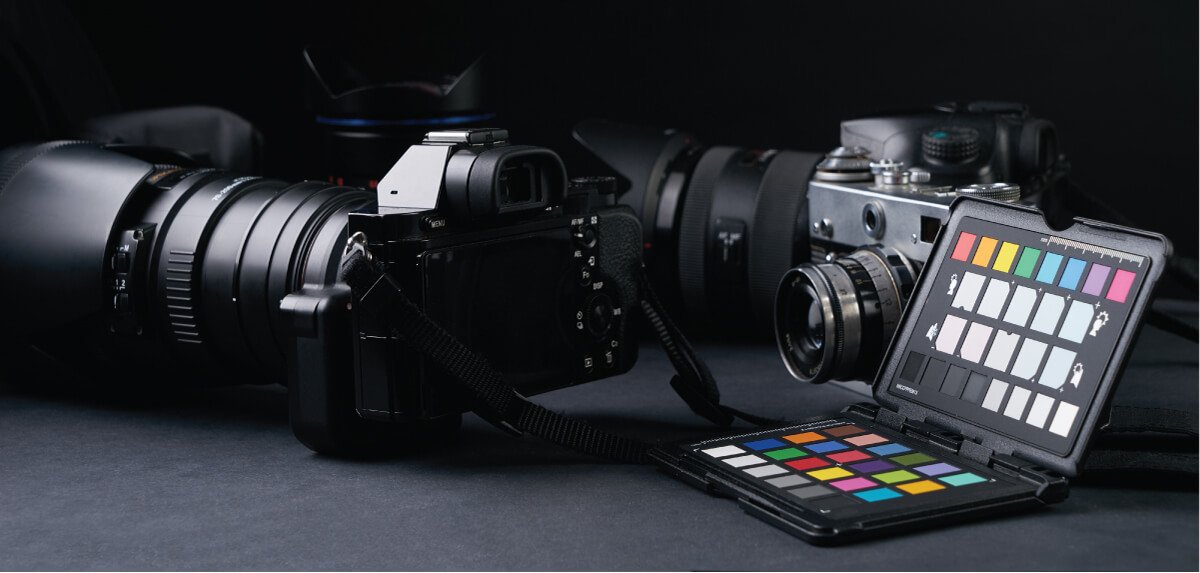
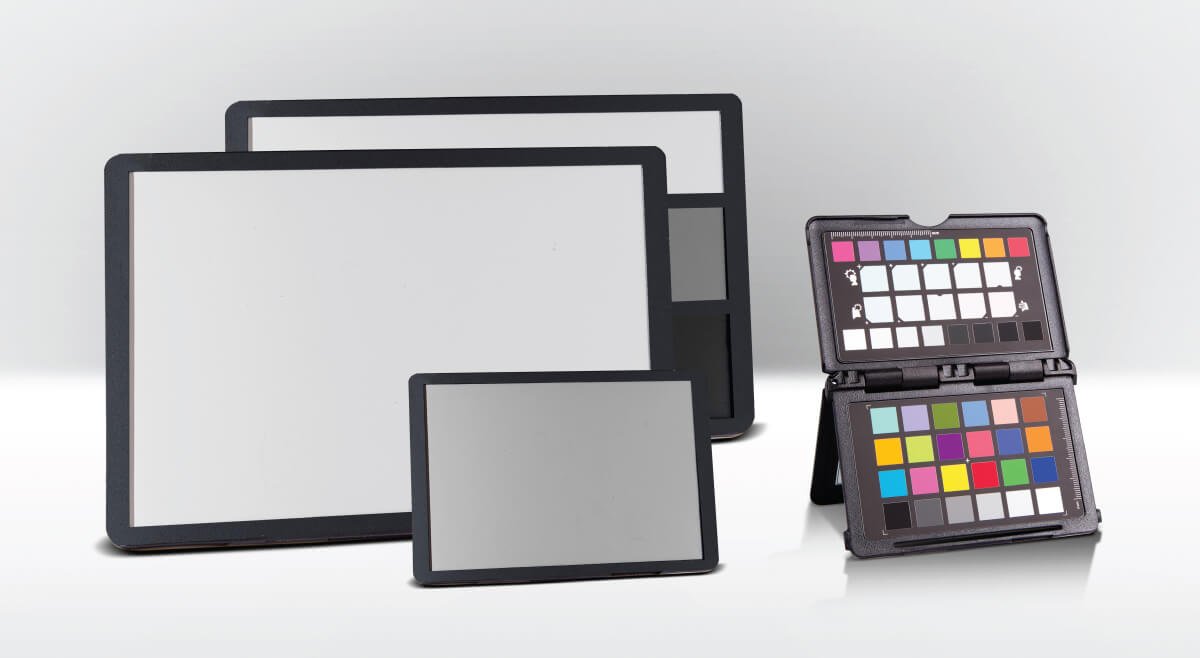
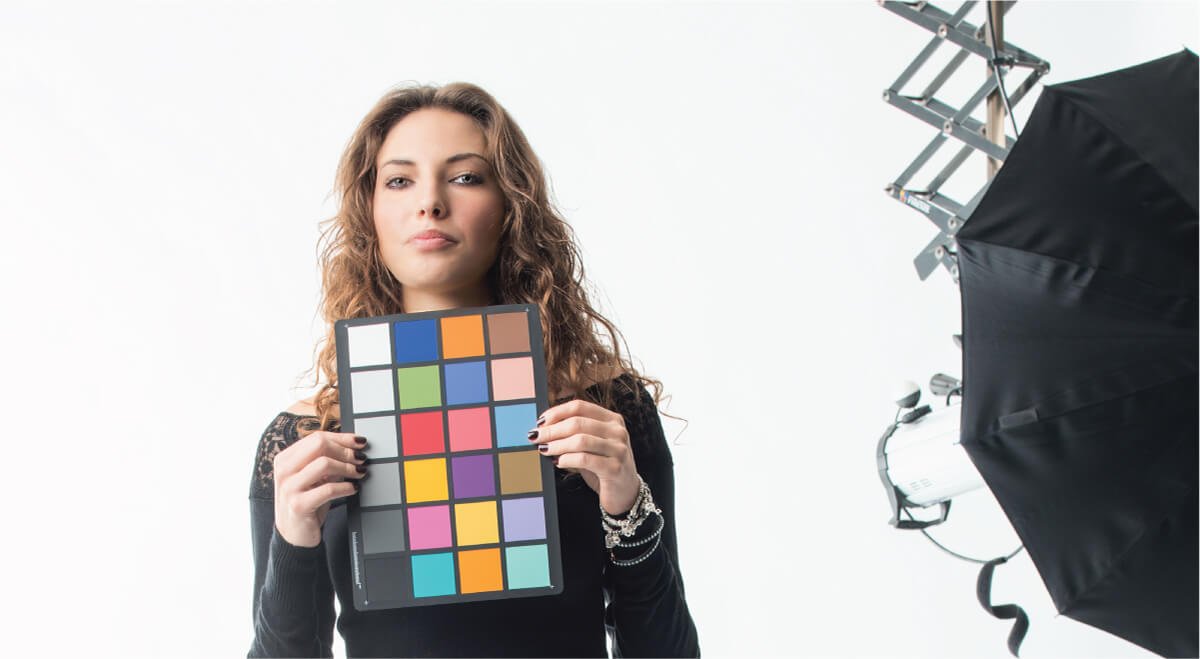
It is very understandable that ambient light can change the mood of photos greatly. Hence, we need to deal with lighting first to preserve the colors we seen at the scene. With the use of an exposure meter, photographers can determine the right aperture and shutter speed settings so photos are not over or under exposed. Exposure meters are designed to deliver the same exposure level across various lighting conditions. Once we have the exposure set, now we need to put a ‘reference’ in the scene to know how to recreate colors at the time of photography. The most widely used ‘reference’ is a color chart containing 24 color patches, called ColorChecker®. It was designed for this purpose. There are different varieties of the color patches, and one particularly useful is called ColorChecker® Passport. Figure 1 illustrates the different varieties of ColorCheckers®, and Figure 2 illustrates how to use ColorChecker® Passport when capturing a photo.
Figure 1.: Different varieties of ColorChecker®: White Balancing and Gray Balancing ColorChecker® on the left, and 24 color ColorChecker® on the left.
Figure 2.: How ColorChecker® Passport was used at the time of capturing.
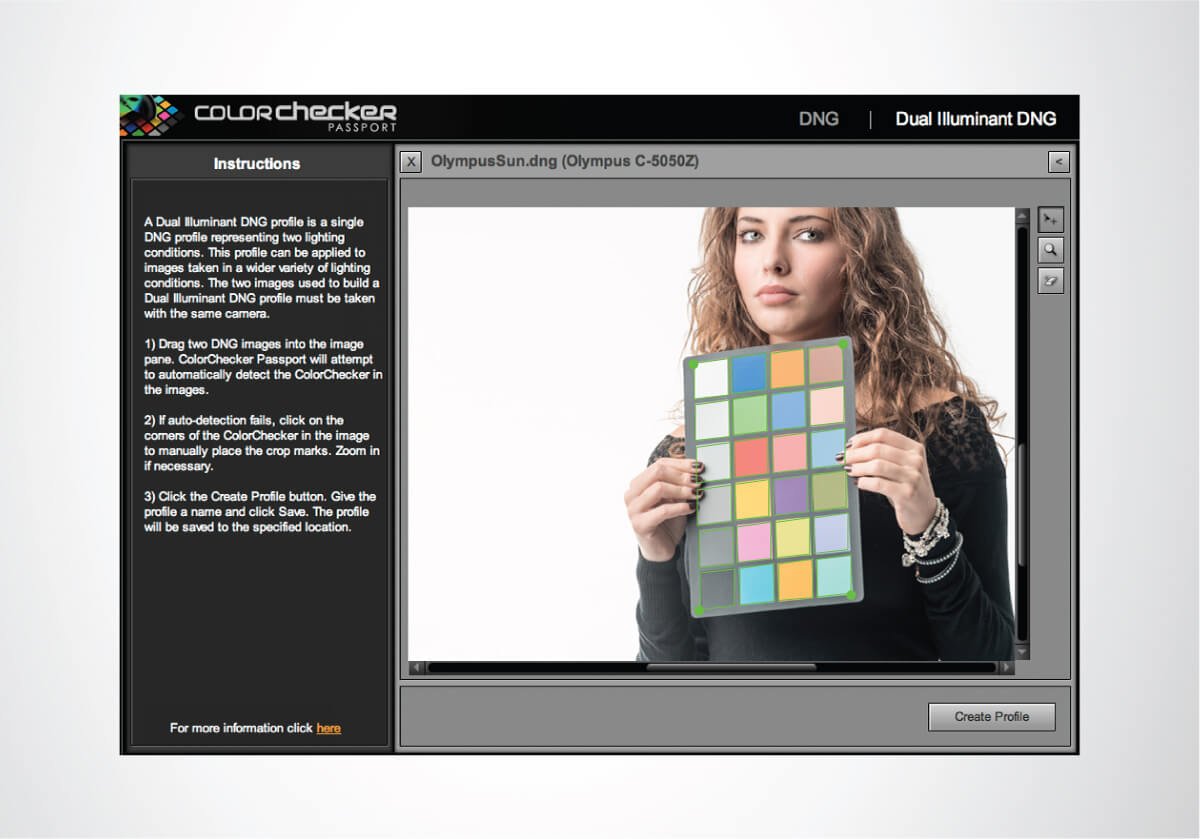
In theory, we could also use the camera ICC profile to obtain the correct colors from the scene. However, an ICC profile will only work best if the capture conditions match conditions when the profile was built. For example, the lighting conditions (color temperature and light level), the camera body and lens combination, and the aperture, shutter speed, ISO, and color mode settings all have to be exactly the same. It is nearly impossible to create an ICC profile under these constraints, so a more practical way is to utilize ColorChecker® when capturing photos and creating a profile. The profile created is not necessarily an ICC profile, but it serves the same purposes as an ICC profile for preserving colors. ColorChecker® Passport comes with its own software to extract color patches to generate a DCP file (Digital Camera Profile); the process is illustrated in Figure 3. The DCP file could later be imported into Photoshop or Lightroom to simulate the capture conditions recorded from the camera.
Figure 3.: ColorChecker® Passport software automatically identifies color patches and uses them to generate a DCP file.
Now, the second stage in the workflow is to enhance photos. This is the stage where the monitor plays a very important role since all final colors are decided here. A color management monitor with hardware calibration capability is definitely the first choice. Needless to say, a good monitor also requires proper calibration. But what targets should a photographer calibrate their monitors for? Here we provide a set of typical calibration targets for reference in Table 1. This set of calibration targets will suit the needs for most photographers.
Table 1.: Set of calibration targets suitable for most photography wor
After properly calibrating your monitor with the above calibration targets, an ICC profile of your monitor will be generated. This ICC profile is an important one to pay attention to, and should be used in Photoshop as your default RGB Working Space. Please follow the steps to change the settings:
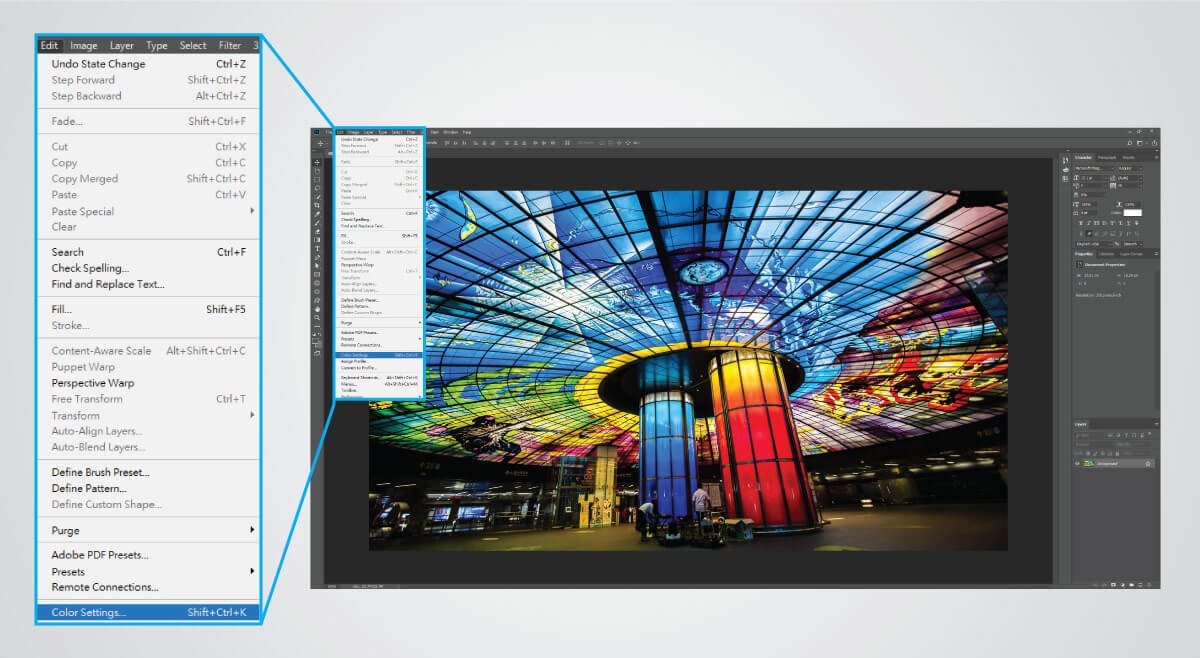
1. Go to ‘Edit’ -> ‘Color Settings’ (as shown in Figure 4).
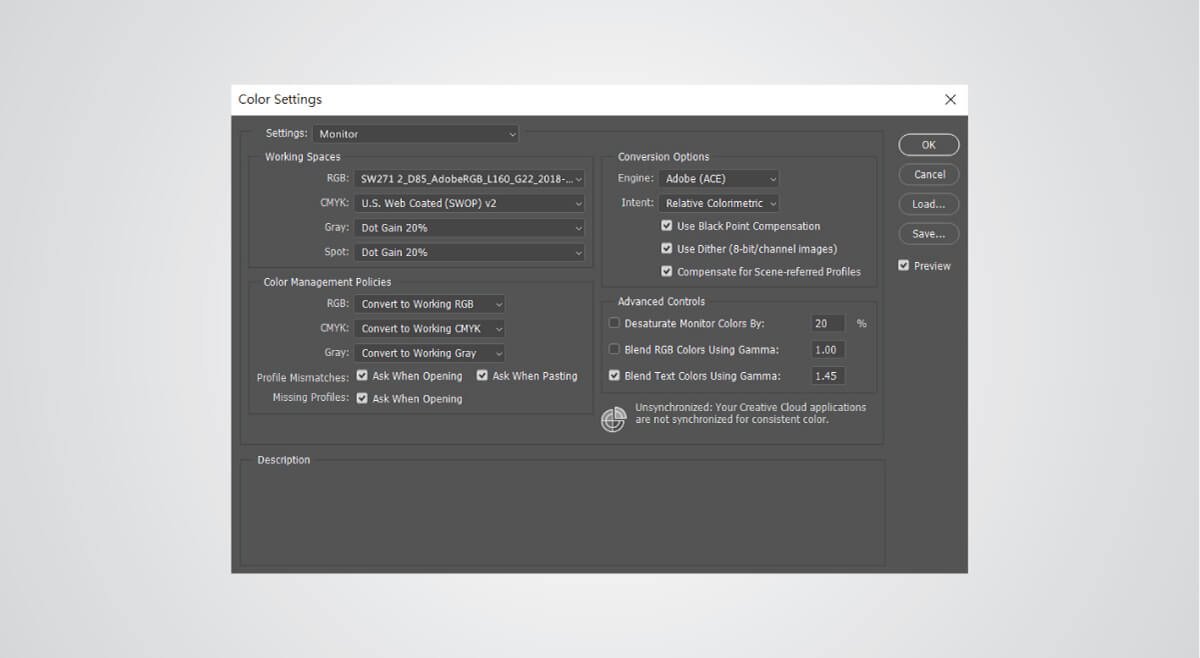
2. In the pop-up window, select your monitor ICC profile from the drop-down list in RGB Working Space (as shown in Figure 5).
3. Select ‘Convert to Working RGB’ under Color Management Policies (as shown in Figure 5).
Figure 4.: Access to ‘Color Settings’ in Photoshop.
Figure 5.: Change RGB under Working Spaces with your monitor ICC profile.
The reason for setting your monitor ICC profile as your RGB working space is because you are working with a physical monitor to edit/modify colors, and by doing so will allow all your adjustments to be truly reflected from your monitor. And in order for this to work, you also need to select ‘Convert to Working RGB’ under Color Management Policies. Of course, it will be safer if you click ‘Ask When Opening’ for Profile Mismatches and Missing Profiles.
Many sources have suggested to use “AdobeRGB” as the RGB Working Space in Photoshop. This is one way to set you working color space, but not the only way. An alternative way is to set your monitor ICC profile as RGB Working Space. In this way, you can have an actual RGB color space that is possible to visualize, which is your monitor. As of today, there is no device that can fully realize 100% AdobeRGB color space coverage. The pros and cons are compared in the following:
One question you may ask is, “where are my ICC profiles?” or “why don’t I see my monitor profile in the drop-down list?” The answer to these questions is “there is a specific folder for ICC profiles and you need to put your ICC profiles there to make them available via the drop-down list.” So where is that specific folder? Windows OS and Mac OS have different locations for ICC profiles, and are listed in the following:
• Windows:
• C:\Windows\System32\spool\drivers\color
• Mac OS:
• \Users\[User Name]\Library\ColorSync\Profiles
where [User Name] is the your user login name
The folder location is OS dependent, but not version dependent. So you could find this folder in different versions of Windows OS or Mac OS. Usually when the monitor calibration is done, the ICC profile will be automatically save to the above location. But if you have other profiles that need to be ‘installed’ to your computer, then just simply copy the ICC profiles to the above folder and restart Photoshop, and you will see profiles are now in the drop-down list.
After all the editing work has been done, now it is time to distribute your work (photos) to the world. But before doing that, you want to make sure everyone else is seeing the same colors as you are, right? Here the concept of ‘soft-proofing’ comes into play. For example, if you send your photos to be printed, you can see the simulated colors from the printer before you actually print the photos. This could be done in Photoshop by utilizing the printer ICC profiles with the correct paper and ink combination. The steps are summarized in the following:
1. Obtain the printer ICC profile with the correct paper and ink combination. It is essential to get the right ICC profile for the paper and ink you are using. The printer ICC profile can be obtained from the printer’s driver or manufacture’s website, by asking your local photo lab or print shop to provide the profile, or generating printer ICC profiles from 3rd party profiling software. There are a number of sources on the internet which can provide detailed instructions for generating your own printer ICC profile, so we will not go into details here.
2. Copy the printer ICC profile to the ICC profile folder listed above.
3. Restart Photoshop if the application is in use before you're done with the copy operation.
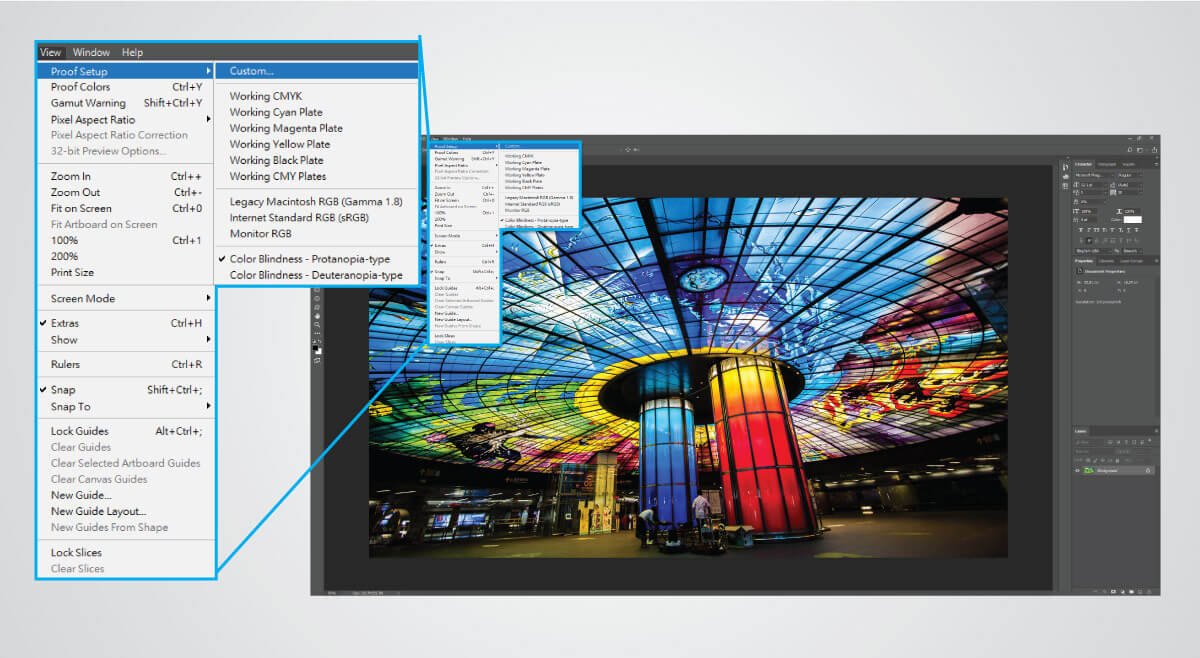
4. Go to ‘View’ -> ‘Proof Setup’ -> ‘Custom’ (as shown in Figure 6).
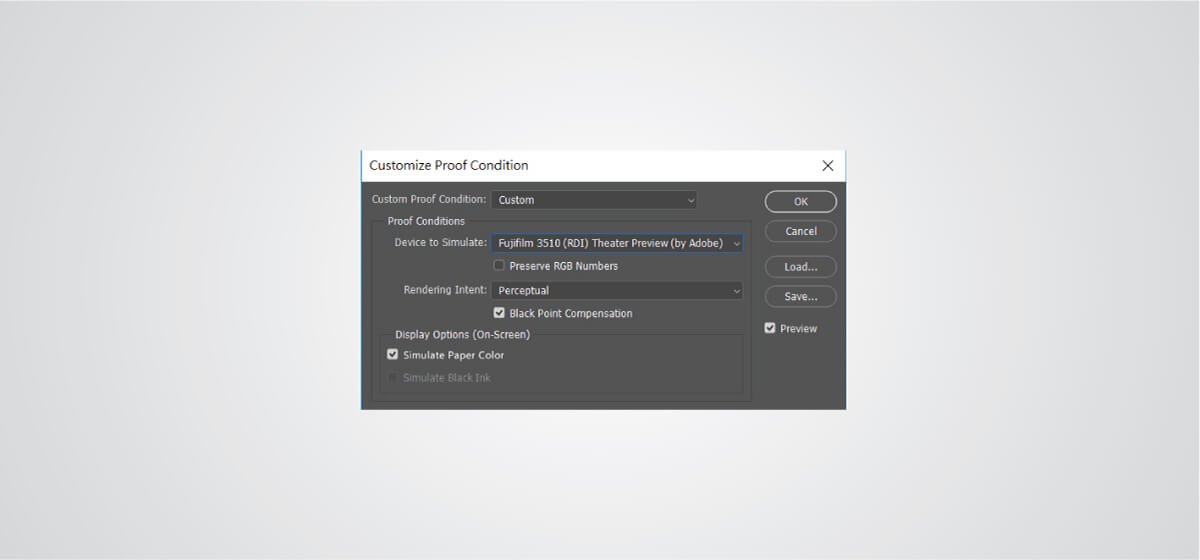
5. In the pop-up window, select your printer ICC profile in the drop-down box next to ‘Device to Simulate’ (as shown in Figure 7).
6. Select ‘Relative Colorimetric’ in ‘Rendering Intent’ drop-down box (as shown in Figure 7).
Figure 6.: Access Custom Proof Setup in Photoshop.
Figure 7.: Select the printer ICC profile in the drop-down box next to Device to Simulate.
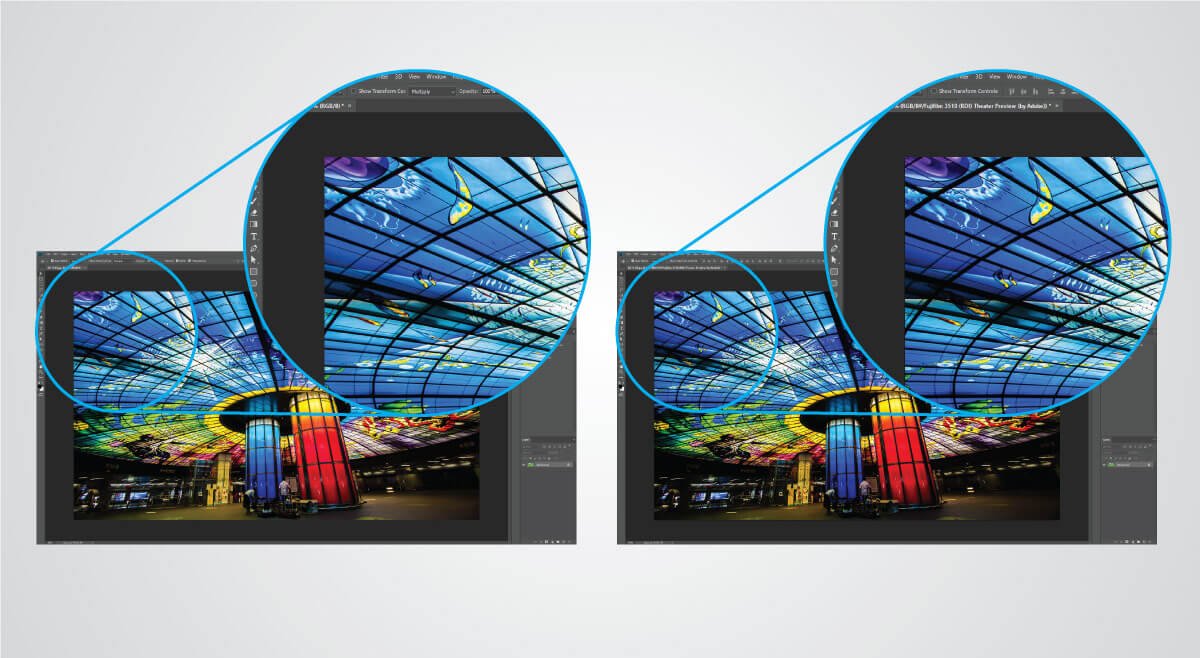
7. Now you will see your photo has changed its appearance. You can select and deselect the check mark next to ‘Preview’ to enable and disable the simulation function. Or you can also close the pop-up window by clicking on ‘OK’ and pressing ‘Control+Y’ (Command+Y for Mac users) to enable and disable simulation. Figure 8 illustrates the ‘before’ and ‘after’ simulation effect in Photoshop.
8. If you would like to correct some colors under the simulation, you can simply go ahead to process the photos as usual, and you will see the effect on the print out.
9. If you are satisified with processing, now the photo is ready for printing. Before you send your photos to your photo lab or print shop, it is always good practice to convert your photos to your monitor ICC profile and embed the profile with your photos. In this way, you local photo lab or print shop could see what the photos are like on your monitor.
Figure 8.: ‘Before Simulation’ (top of the figure) and ‘After Simulation’ (bottom of the figure).
Most photos nowadays are not printed at all, but published mainly on the web. This will be much more tricky to deal with than print cases if you would like the colors to be correct for everyone. We have no knowledge of what kind of monitors that the viewers might have, therefore, we could only assume sRGB monitors will be used. So it is the viewer’s responsibility to make sure their monitors comply with sRGB requirements. Before publishing the photos on the internet, let us convert them to the sRGB color space. The steps are shown in the following:
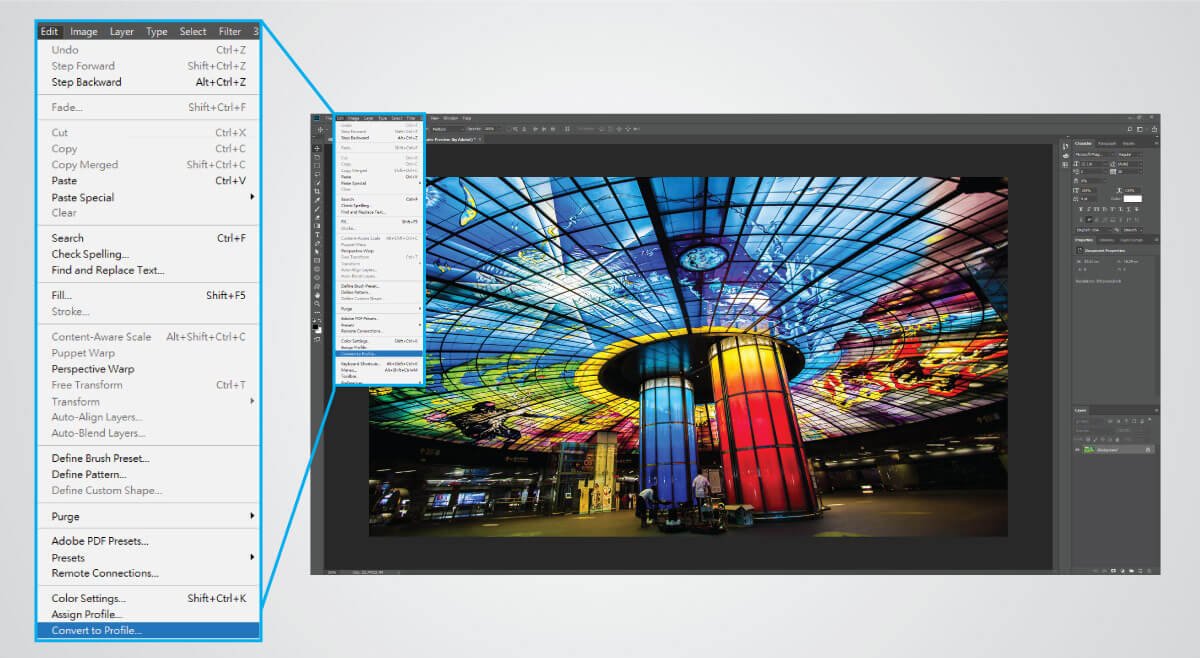
1. Go to ‘Edit’ -> ‘Convert to Profile’ (as shown in Figure 9).
2. In the pop-up window, select ‘sRGB IEC61966-2.1’ in the drop-down box under ‘Destination Space’ (as shown in Figure 10).
3. Click on ‘OK’ to close the pop-up window.
4. Go to ‘File’ -> ‘Save As’.
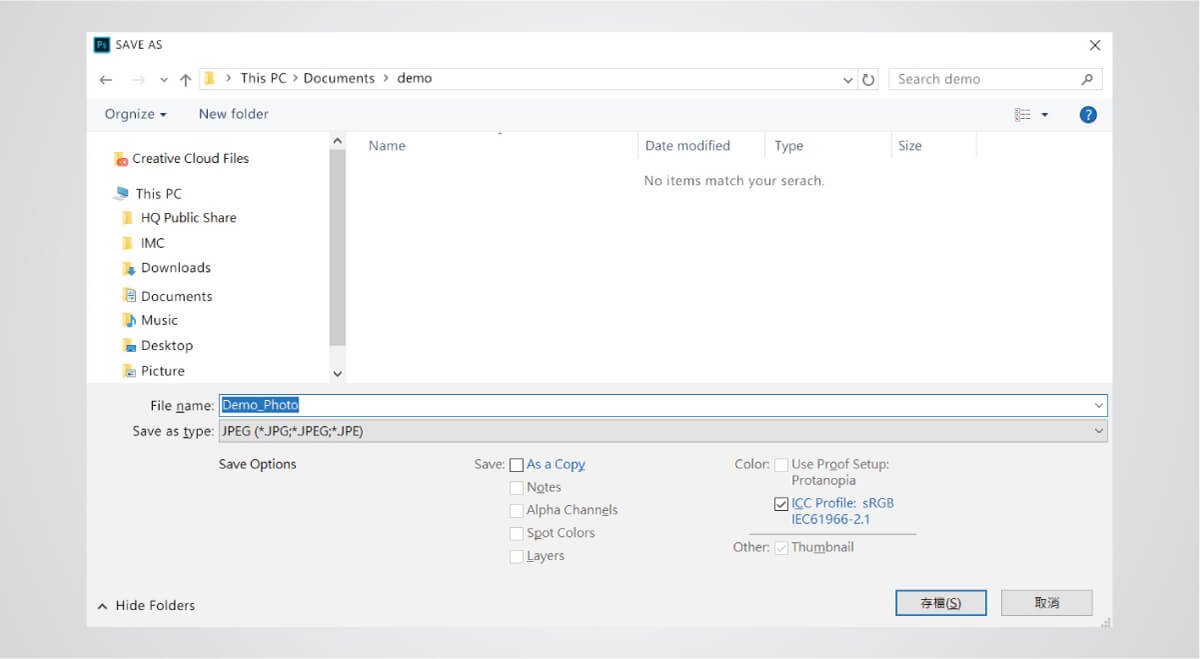
5. Click on ‘Embed Color Profile’ in the ‘Save As’ window (as shown in Figure 11).
Figure 9.: Access ‘Convert to Profile’ in Photoshop.
Figure 10.: Select ‘sRGB IEC61966-2.1’ in the drop-down box under ‘Destination Space’.
Figure 11.: Click on ‘Embed Color Profile’ to embed the sRGB color profile in photos to be sent out.
Many photographers use Lightroom to print their photos, so here we will introduce how to color manage photos in Lightroom. First, obtain the ICC profile of the printer you will use to print the photos. Make sure you have saved the profile in the correct folder (using the process described above under Enhancing Photos on a Calibrated Monitor). In Lightroom Classic, select the ‘Print module in the upper right corner of the screen, then select the photos you would like to print in the photo strip in the bottom as shown in Fig. 12. In the right-hand panel, scroll down to ‘Print Job’ and then under ‘Color Management,’ select the ICC profile of the printer you would like to use, as in Fig. 13. Select ‘Perceptual’ as your rendering intent. Make sure all other print settings are correct, then hit ‘Print.’
Figure 12: ‘Print Module View’ in Lightroom Classic.
Figure 13: ‘Printer ICC Profile Selection’ under ‘Color Management.’
In this article, we learned how to use ICC profiles to maintain color consistency during a photographer’s workflow. In order to capture the right colors of a scene, an exposure meter and a color checker are necessary for capturing light and colors correctly. On a properly calibrated color management monitor, we could utilize monitor ICC profiles to simulate image print out appearance or the way they will appear on any other device which has an ICC profile. Lastly, we also pointed out that before publishing photos on the web, it is necessary to convert the color space to sRGB and embed the profile with the photos. We also shared helpful tips for utilizing ICC profiles in a photographer’s workflow, for example, how to set up RGB Working Color Space, where to store the ICC profiles, and how to convert color spaces.
Get One Free Year Pantone Connect
$90 value
{{item.productWordingTag}}
{{currency}}{{item.finalPrice| numberThousandsCommas | numberDecimalPoint}} Save {{currency}}{{item.saveAmount | numberThousandsCommas | numberDecimalPoint}} Save {{item.savePercent | numberThousandsCommas | numberDecimalPoint}}%
new device price{{currency}}{{item.regularPrice| numberThousandsCommas | numberDecimalPoint}}

?$ResponsivePreset$&fmt=png-alpha)
?$ResponsivePreset$&fmt=png-alpha)