Here are some of the frequently asked questions on how to choose and install projectors about creating your golf simulator room.
- What is the right throw ratio?
-
By definition, the throw ratio is the distance from projector to screen divided by the width of the image. The throw ratio spec for any projector assumes you're using the full width of the native resolution, which isn't true for many home golf simulators. The best position for the projector will usually be roughly 4 feet behind the tee location, which makes the distance easy enough to figure out. However, the width of the simulator space is a limiting factor, and thus you can use a 16:9 or 16:10 projector to project a 4:3 image. In this case, you won't be using the projector's full image width, and for easier calculation we suggest you choose the right throw ratio using the modified formula to calculate distance and height.
Using the full width of the projector (4:3 projector to project a 4:3 image):
-Throw ratio=Distance / Width
Not using the full width of the projector (16:9 or 16:10 projector and adjusting the image to a 4:3 ratio):
-For a 16:9 projector, choose a projector with a throw ratio=0.5625 x Distance / Height
-For a 16:10 projector, choose a projector with a throw ratio=0.625 x Distance / Height
- Why is a short throw projector needed?
-
If the projector is hanging on the target line, it's the safest place in the room. About 7-8 feet from the screen is sufficiently away from the screen to avoid a ball hitting a projector, and no more than 2 or 3 feet behind the player to avoid shadows. Based on this, you can measure the distance to the impact screen and the height of the screen, and then calculate the throw ratio you need. A projector with throw ratios ranging from 0.5 to 1.1 helps you put the projector where it is needed to fill the screen while being mounted safely outside the hitting area (and without casting a shadow).
- How to choose the right resolution?
-
Resolution is what enables you to see the details on every blade of grass and the subtle contours on the green. Full HD 1080p or WUXGA is OK, but 4K is preferred. For the best widescreen experience, a 4K projector will create an immersive image even on impact screens larger than 14 feet wide. This is especially important if you are using a system such as Foresight, TruGolf, and other simulators that support 4K output.
- How to choose the right aspect ratio?
-
For the impact screen to be tall enough to accommodate the path of the ball and still fit in the typical width for a home golf simulator projection, it usually winds up as a 4:3 aspect ratio or close enough to need a 4:3 image, because that allows you to go taller, giving you more room to swing without needing a bigger room. It’s not difficult to find a projector with a native 4:3 aspect ratio, but many are lower resolution, such as XGA or SVGA. Image quality greatly increases when using a native 16:9 or 16:10 projector, with WUXGA or 4K resolutions. So as a practical matter, we suggest using a projector that has a native 16:9 or 16:10 aspect ratio, then adjusting the image to give you a 4:3 aspect ratio.
Learn More: How to Fill Up Your 4:3 Golf Sim Impact Screen?
- How to choose a projector that's also for home theater usage?
-
4K short throw projectors should be your first consideration. 4K UHD delivers awe-inspiring clarity and crisply defined details that enable you to see all of the minute nuances on the latest 4K golf simulator courses. It allows your impact screen to double as an amazing home theater for movies or watching the Masters Tournament when you’re not practicing your golfing skills. On the other hand, the percentage difference in price between WUXGA and 4K isn't that significant among higher end models. If you plan to buy a single projector for both a golf simulator and home theater, the extra cost for 4K may well be worth it.
- How many lumens are needed for a good golf simulator system?
-
Golf simulation projectors need to be brighter than a home theater projector, since you need enough light in the room for your camera to see your club and track ball spin as it travels to the impact screen. A 3000 ANSI lumen projector is a good starting point for a smaller impact screen, but for larger screens that are 10 feet or wider, you will want to look for a 4000 lumen or brighter laser projector.
- Why are lens shift and keystone functions so important?
-
If you mount your projector to the side, above, or below the center of your screen, these functions are important. You'll usually need a short throw projector that offers sufficient vertical and horizontal lens shift to align the image relative to the screen, or keystone adjustment to square off the picture when the projector is sufficiently far off to the side.
- What is the benefit of 4K projectors?
-
Resolution is what enables you to see the details on every blade of grass and the subtle contours on the green. You can't beat Tiger when putting unless you can see the break. 4K UHD delivers awe-inspiring clarity and crisply defined details that enable you to see all of the minute nuances on the latest 4K golf simulator courses. This is especially important if you are using a high-end system simulators optimized for use with software such as E6 CONNECT or TGC 2019 that supports 4K outputs.
- Why projector offset matters?
-
Projector offset refers to the distance between the center of the lens to the bottom of the image when placing the projector on a table or the top of the image when mounting the projecting from a ceiling. The offset you need depends on ceiling height and screen size. Golf simulator setups usually go with overhead-mounted projectors installed upside down, and the projected image needs to reach the floor to create a realistic experience. For example, a ceiling mount projector with 100% offset displays an image with its top edge in line with the center of the lens. In a small room where the ceiling is lower than 9 feet, a projector with an offset larger than 110% may require you to tilt it up and go with keystone correction to get an image that fits properly on your screen. This may compromise brightness and resolution.
- What is the benefit of laser projectors?
-
A laser projector is vastly superior to a simpler lamp projector for simulators. Most last the life of the projector, are essentially maintenance free, and offer instant on and off capability. The laser projector will deliver consistently bright images for well over a decade in a golf simulator and be much brighter than a similarly rated lamp-based projector year over year. A projector lamp with 4000 hours of lamp life loses brightness after each hour of use, which means your projector could only be showing 3000 lumens on the screen after a year or so of use, and less after that. Of course, you can change the lamp, but at a cost.
- Why choose a DLP projector?
-
DLP projectors can produce superior definition and clarity in small-size text and fine details, and are especially good for displaying your distance, name, or score on the screen. With a sealed design that protects the DLP chip from dust-induced image degradation and the industrial-grade durability of DLP projection technology, BenQ DLP projectors are capable of maintaining long-lasting picture quality by eliminating color decay. Also, BenQ DLP projectors are filter-free and every laser projector has certified IP5X-rated (just like an Apple Watch), dustproof, sealed engine that eliminates the need for filters, and is perfect for environments such as garages or basements.
- What is a 4K upscaling projector?
-
Not all golf simulator software supports 4K resolution, and a 4K upscaling projector helps ensure that even non-4K content is shown to its full potential. This means the resolution of a video is increased by an algorithm for better quality and playback on a higher resolution screen. If your projector has a good upscaling engine, you can upscale the original resolution from 1920x1080 to 3840x2160. The upscaled 4K content may look sharper and more detailed than 1080p content, as it will have more pixels to work with. But remember, although both native and upscaled offer the same resolution, native 4K is better as the picture contains more detail.
- What to do if Auto Screen Fit fails?
-
Step 1: Check the aspect ratio of your enclosure or impact screen
- Auto Screen Fit supports 16:9, 16:10, 4:3, and 1:1 aspect ratios.
- For non-standard aspect ratios, please view the article and adjust via graphic card settings.
- Enclosure or screen border requires at least 2.4 inches (6cm) of width
Step 2: Check the environment
- Ensure the contrast between the screen and the surroundings
We recommend that the surrounding environment (e.g., screen border, wall, or grass) provides enough contrast, if the screen border isn't wide enough. This helps the projector detect the screen more effectively. If your setup does not have strong contrast, no worries. You can still proceed with the following steps.
- Lighting
Please turn off all lights in the room. Running Auto Screen Fit in a completely dark environment gives the best detection results and helps avoid interference from ambient light.
Step 3: Ensure the projection fully covers all 4 corner screen
When the Auto Screen Fit pattern is projected, make sure it extends beyond all four edges of the screen. Ensure the projection area is larger than the screen, with all four corners of the screen included, and avoid strong lights directly hitting the screen, which can interfere with detection.
Also, please make sure all 12 circle patterns are all in the screen.
Step 4: Click the Auto Screen Fit button again
Try reactivating the Auto Screen Fit function ( Make Sure all 4 corner patterns are inside the screen border, Press [OK] to proceed and start activating Auto Screen Fit. )
Step 5: Reset and restart the projector
If the issue persists, try doing a factory reset on the projector. Then restart it and run Auto Screen Fit again.
- How to adjust my image to fit the screen?
-
1. Connect your projector to your PC then turn both on.
2. Choose the right display resolution for your projector on your PC. Please choose the highest resolution that best matches the aspect ratio of your golf screen. For example, if your screen is 4:3 and your PC offers 1600x1200 as the highest 4:3 resolution, you should choose that one.
3. Install your golf sim software. Some software titles may ask you to setup display resolution. If so, set it as the one you choose in the second step.
4. Find the right distance: locate the position where the 4 corners of the projected image all go beyond your display area. This buffer is reserved for digital correction. If you use side projection, you'll have a trapezoid image with different heights in the left and right. Remember that the more off-center the projector is, the more buffer you have to leave for digital correction.
5. Mount your projector: mount your projector at your chosen distance and make sure image height is as vertical as possible to the floor. You may use lens shift (availability varies by model) or adjust ceiling mount length to move the image and align it with your golf screen.
6. Correct the image with 2D keystone: if you use side projection or tilt projection, apply vertical keystone until the left and the right side of the projected image is vertical to the floor. Secondly, apply horizontal keystone to correct the image until the top line of your image is parallel to the floor. Make sure all 4 corners of the projected still fall beyond your desired display area.
7. Correct the image with corner fit: use the corner fit function to adjust each corner of your image until it becomes rectangular.
8. All set!
- What is the right distance between the projector and the screen? How to avoid the ball hitting the projector, and how to avoid casting shadows?
-
If the projector is hanging on the target line, it's the safest place in the room. About 7-8 feet from the screen is completely okay to avoid a ball bouncing off the screen and coming back to hit a projector and no more than 3 or 4 feet behind the player to avoid casting shadows.
- Will keystone correction affect image quality?
-
Keystone correction is needed when a projector is mounted in a position that is not in line with the screen. When a projector is not perfectly in line with the screen, the image appears trapezoid. With keystone correction, the projector will skew the image vertically or horizontally to correct the trapezoid image back to a rectangular image on the projection screen. It is a digital process where the projector uses scaling and compression to alter the image. This will result in compromised image clarity.
- How to adjust my image to fit the screen?
-
1. Connect your projector to your PC then turn both on.
2. Choose the right display resolution for your projector on your PC. Please choose the highest resolution that best matches the aspect ratio of your golf screen. For example, if your screen is 4:3 and your PC offers 1600x1200 as the highest 4:3 resolution, you should choose that one.
3. Install your golf sim software. Some software titles may ask you to setup display resolution. If so, set it as the one you choose in the second step.
4. Find the right distance: locate the position where the 4 corners of the projected image all go beyond your display area. This buffer is reserved for digital correction. If you use side projection, you'll have a trapezoid image with different heights in the left and right. Remember that the more off-center the projector is, the more buffer you have to leave for digital correction.
5. Mount your projector: mount your projector at your chosen distance and make sure image height is as vertical as possible to the floor. You may use lens shift (availability varies by model) or adjust ceiling mount length to move the image and align it with your golf screen.
6. Correct the image with 2D keystone: if you use side projection or tilt projection, apply vertical keystone until the left and the right side of the projected image is vertical to the floor. Secondly, apply horizontal keystone to correct the image until the top line of your image is parallel to the floor. Make sure all 4 corners of the projected still fall beyond your desired display area.
7. Correct the image with corner fit: use the corner fit function to adjust each corner of your image until it becomes rectangular.
8. All set!
- How to switch aspect ratios with BenQ’s Screen Fill feature?
-
BenQ Screen Fill function allows the projector to easily switch directly from its native resolution to other resolutions and aspect ratios to best match your desired display with maximized pixel counts while avoiding image distortion. You don’t need to go into graphics card or Windows display settings, which saves time and bother.
1. Open the Advanced Menu and select the Display sub-menu through the OSD of your BenQ projector. Find Screen Fill and select the resolution you prefer.
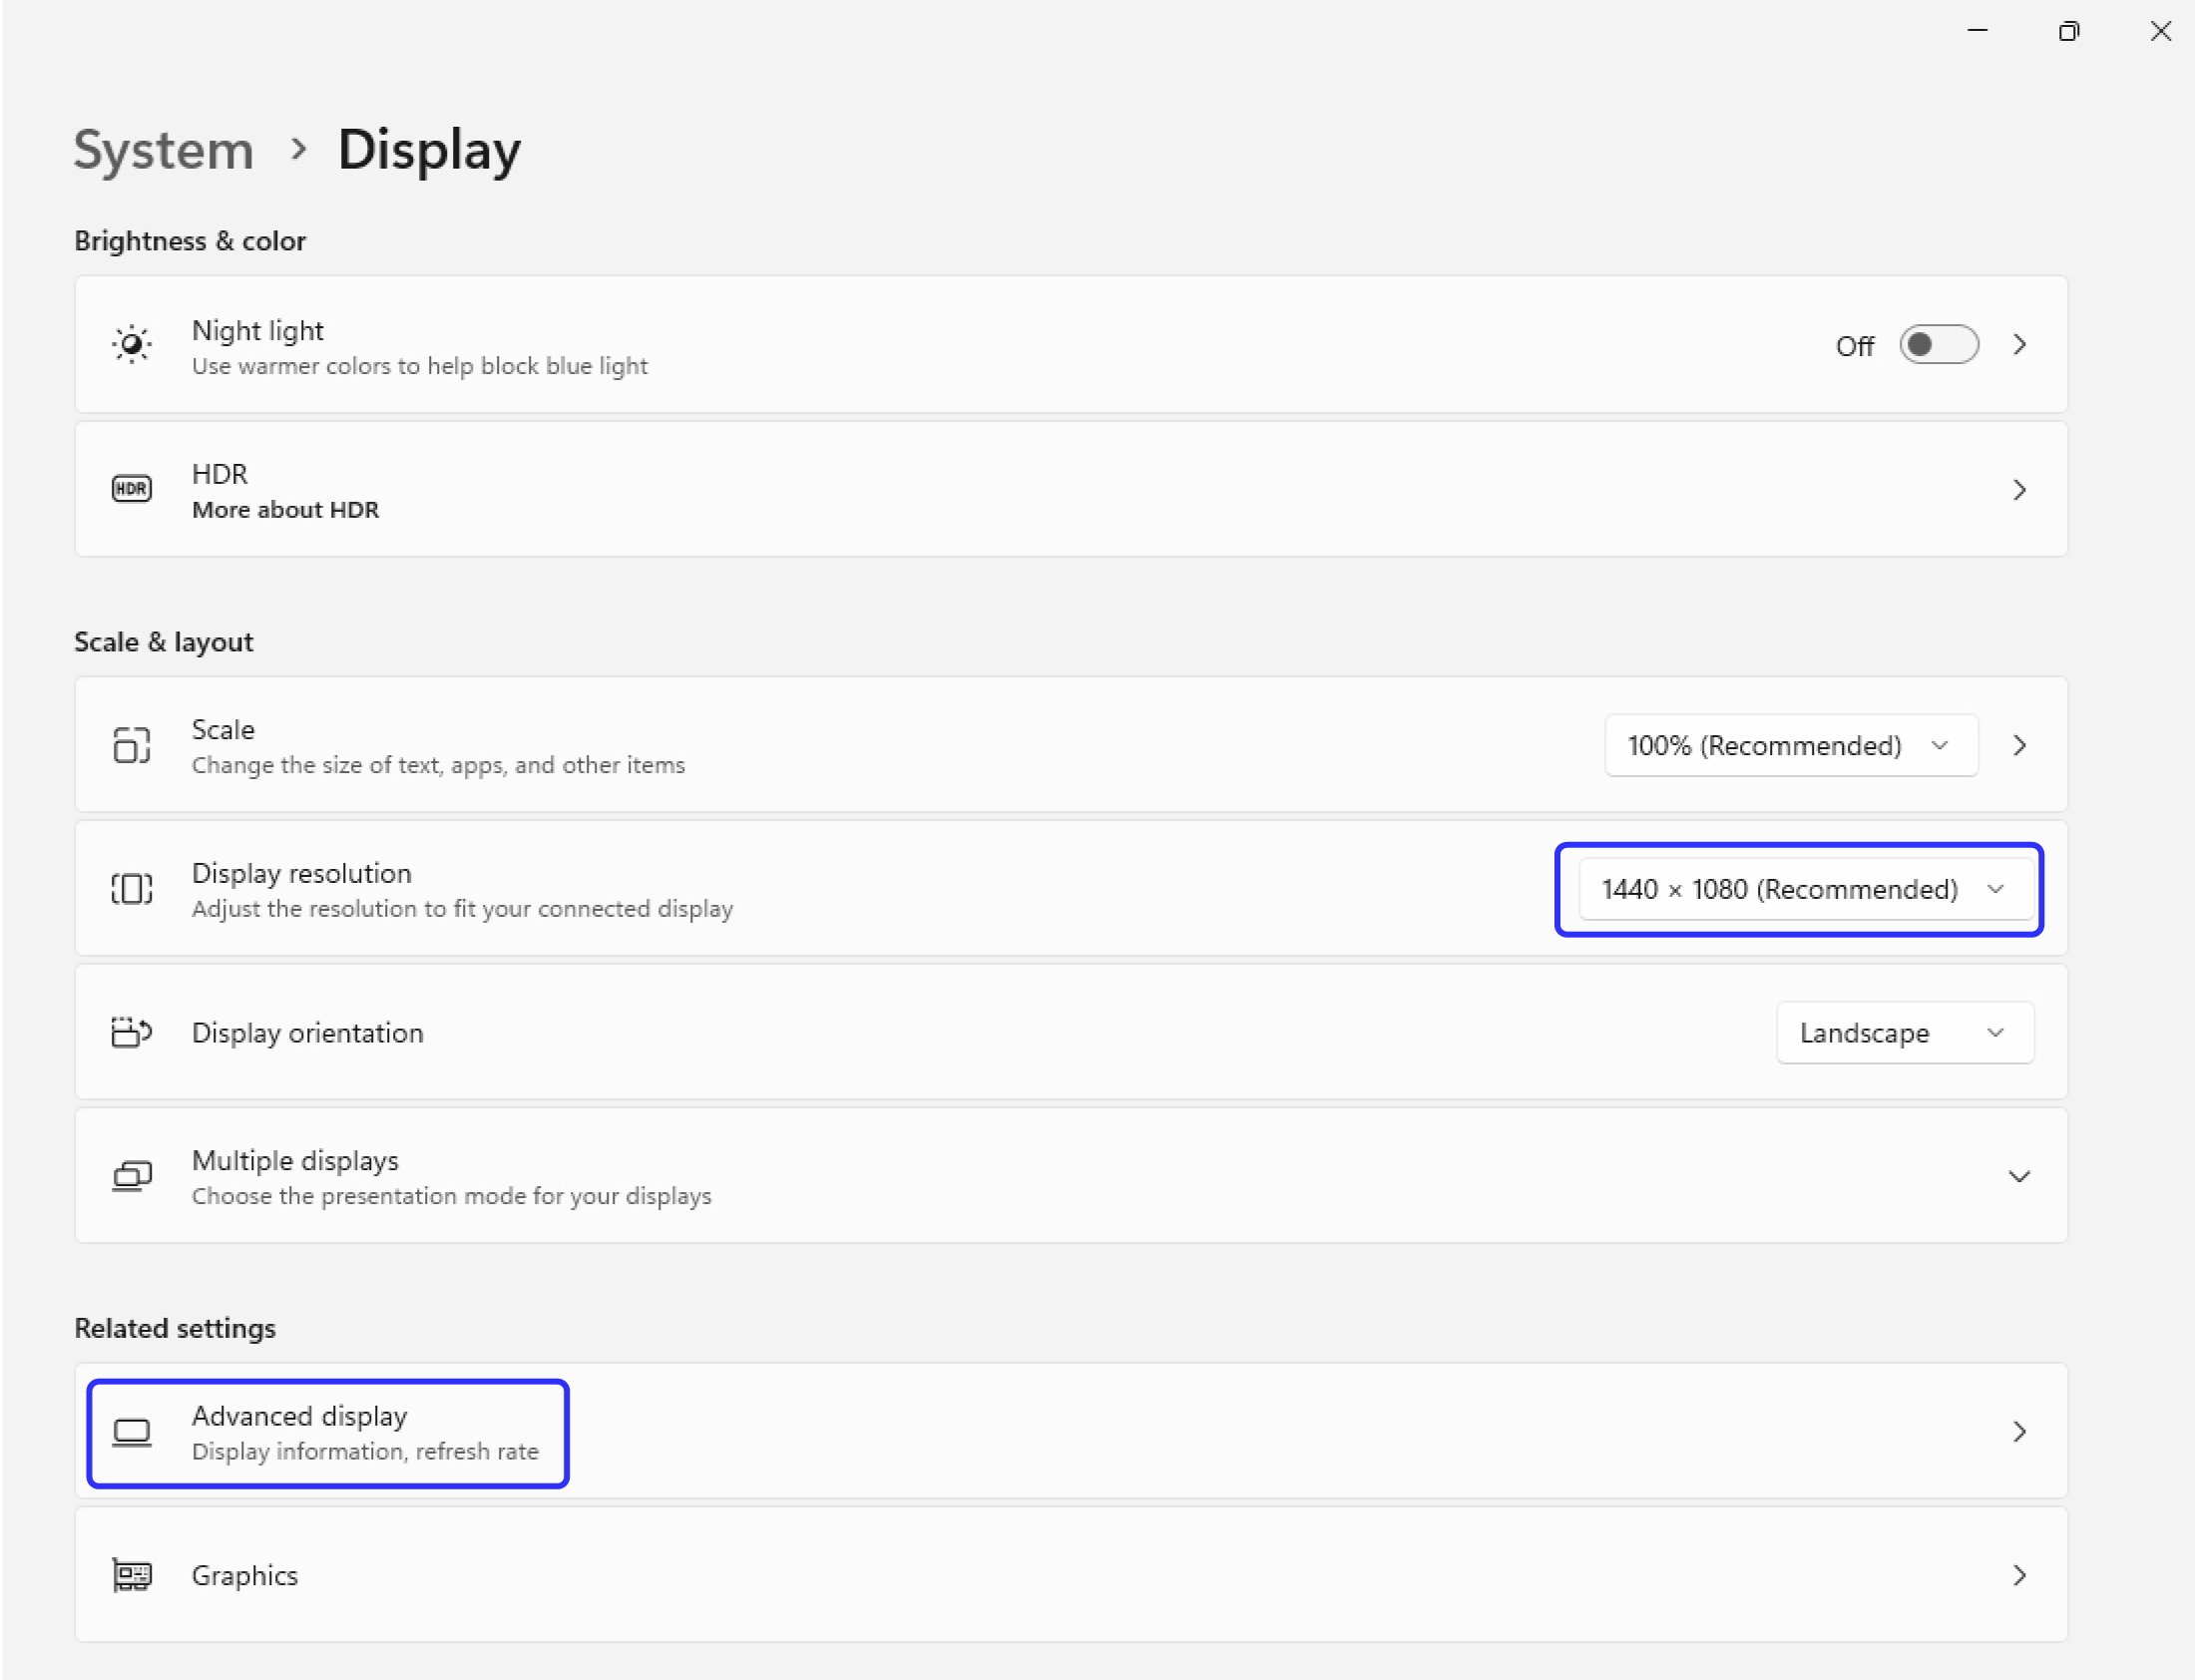
2. Right click on your PC desktop. Select Display Settings, then confirm Display resolution is set to Recommended.
3. Select Advanced display settings.
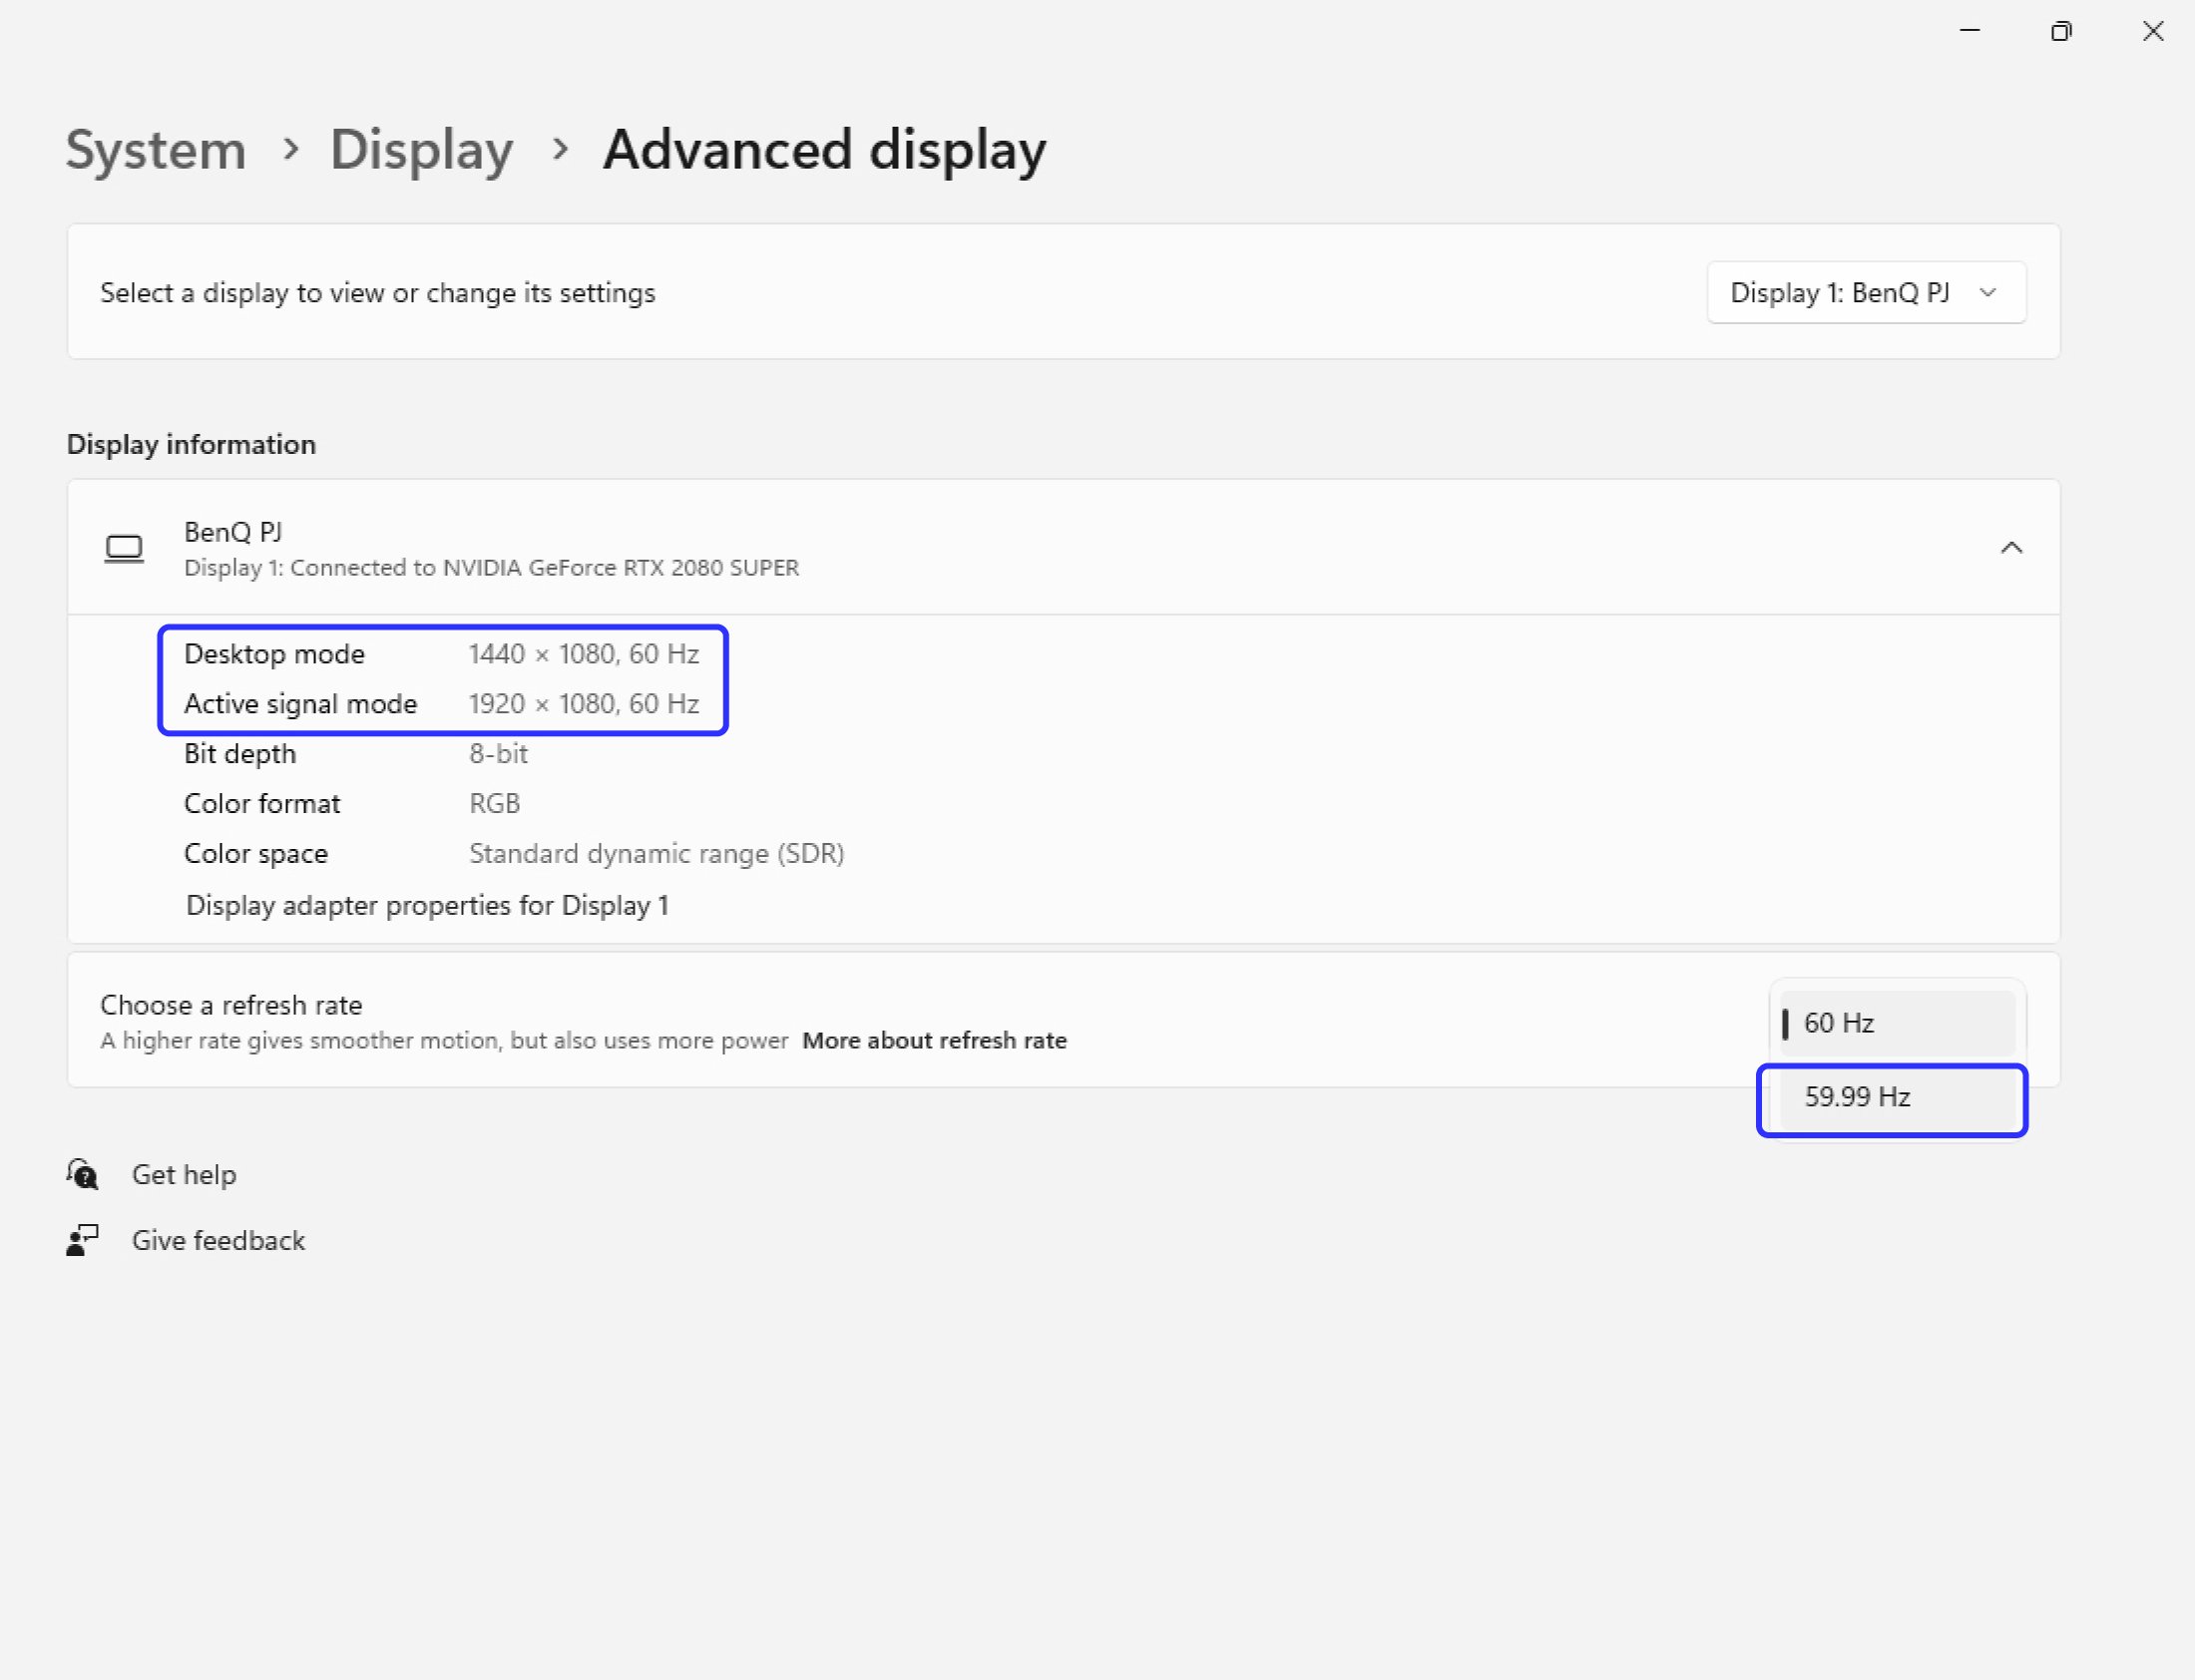
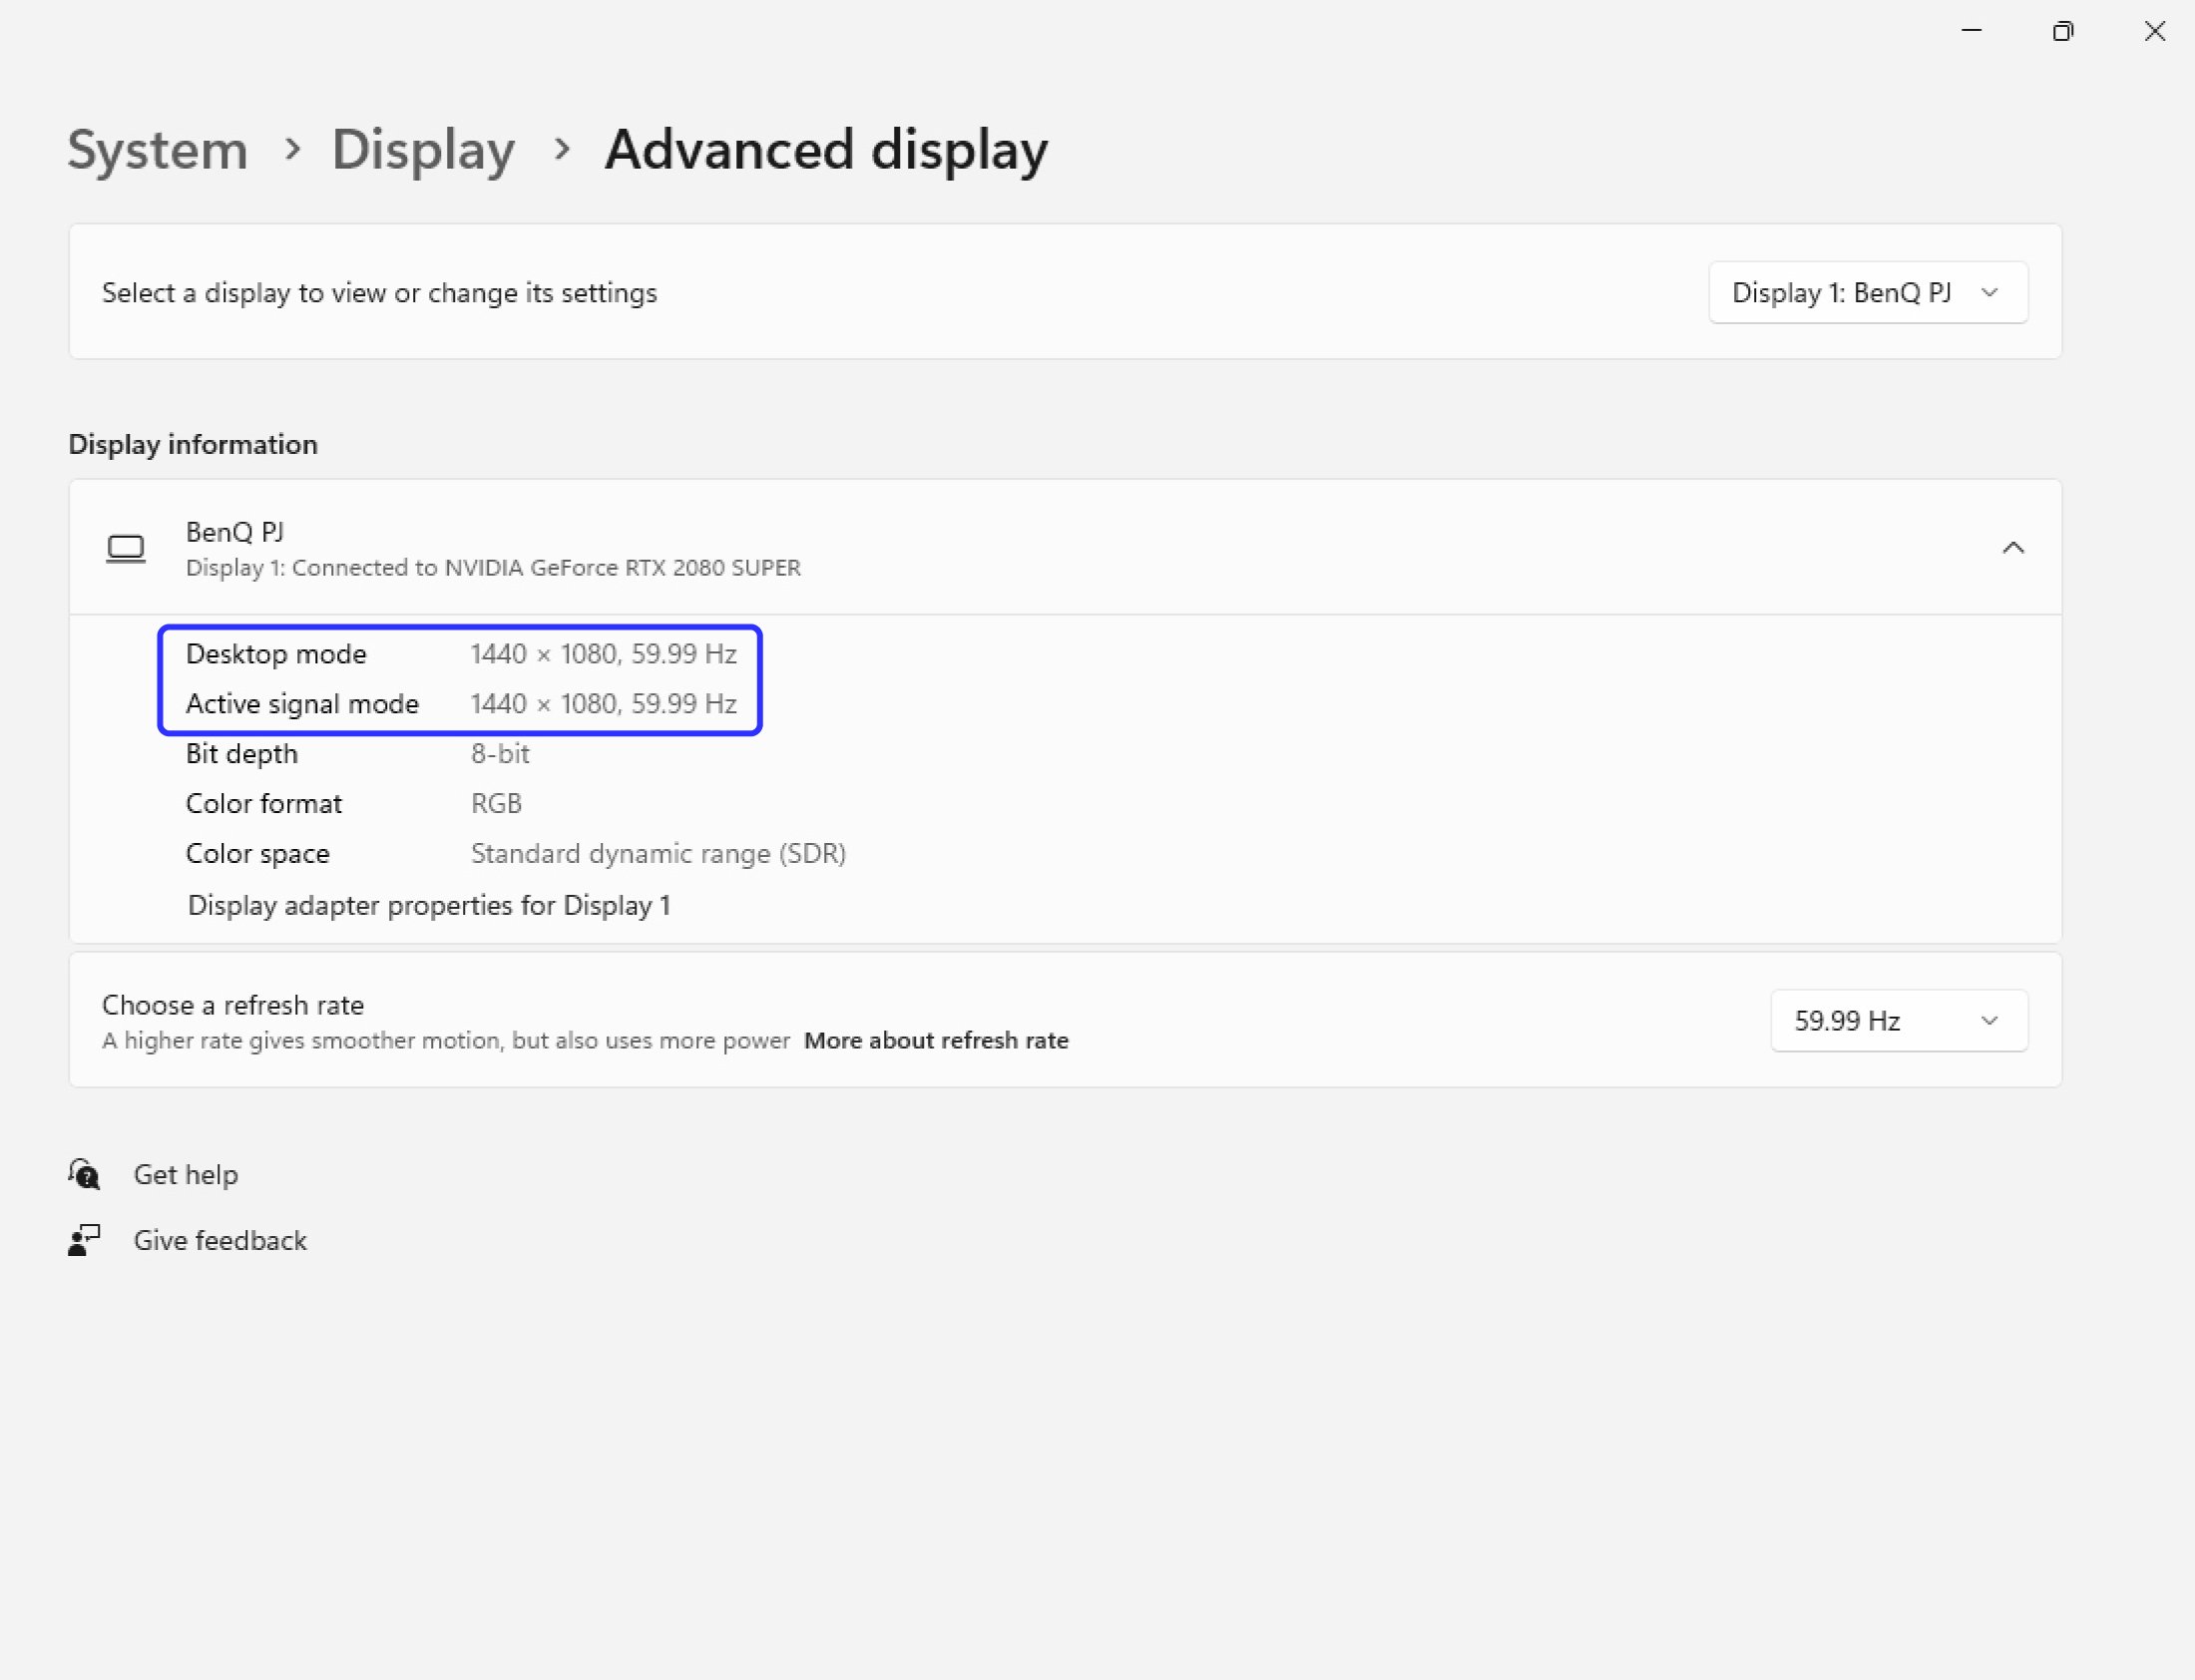
4. Change the Refresh Rate to ensure the Desktop mode and Active signal mode matched.
- How to ensure the right screen resolution?
-
You can set up a custom resolution through your graphics card control center, allowing the projector to switch from its native resolution to other resolutions and aspect ratios to best match your desired display. Here is the video that show you how to set up from the NVIDIA Control Panel.
When done, remember to change the Refresh Rate to ensure the Desktop mode and Active signal mode matched.
- When does the projector lamp require changing?
-
A projector lamp inevitably loses brightness after each hour of use, which causes image degradation. We suggest you follow the specified lamp life hour rating as a guide to when the lamp may need replacing. For example, a projector with a 4000 hour lamp would require a lamp change once those 4000 hours are up. You can find light usage time stats in the Information page of the On-Screen-Display menu. This doesn't mean the lamp will suddenly fail when it reaches its estimated lamp lifetime. You can continue to use the lamp until complete failure, but doing so impacts image quality.
Want to Talk to a Golf Simulator Projector Expert?
BenQ has trained staff to help you find the perfect golf simulator projector – within your room size and budget. To help you make the best decision, you can reach out to one of our experts to set up anything from a chat to a complete online demo, to help you find the right projector for your needs.


