Search history
Clear
Get Fast, Easy, and Secure Wireless Touch on BenQ Interactive Displays with Any Computer in the Classroom
- 2020-09-03
If your teaching curriculum requires that you use a Windows software solution such as Smart Notebook or Microsoft Whiteboard in your classrooms, you may be thinking about whether or not to install a Windows OPS into your interactive displays. This article explores the three different options you can use to run Windows on an interactive displays and help you decide what is best for your classrooms.
Connect a standard HDMI and USB peripheral cables directly from your computer to the display
Install a Windows OPS computer directly into the interactive display slot
Use a wireless presentation system to control your notebook or PC
Option #1 – Hard wired with HDMI & USB Cables
Whiteboards such as Smart and Promethean traditionally used a projector and fixed cables to connect their Windows apps to the whiteboard and projector. But with the introduction of higher resolution projectors and flat panels, HDMI cables are needed to ensure a crisp, sharp picture on the projector.
The problem with HDMI cables and USB cables can only send the signal so far before they degrade. This can be especially difficult if you are using an interactive panel on a mobile stand where long cables can lose signal – and create tripping hazards if they are not hidden. That’s why many schools were looking at an integrated OPS running Windows from the interactive display.
Option #2 – Integrated Windows OPS
A Windows OPS is a specially designed PC that it turns your interactive display into a giant interactive computer. You log onto Windows just like you would from your notebook, and the screen acts like a huge laptop touchpad. So why wouldn’t every interactive display have one of these? There are three major reasons:
First, they are expensive. A Windows OPS can cost nearly twice as much as a similarly equipped Windows notebook. Second – they require the same software licensing and security protection deployed on your teacher’s notebook. This can double the software and IT costs of each classroom. Finally, they can require extra training to make sure the teacher can manage tasks such as switching operating systems quickly during a lesson. This is a big change from the old whiteboards, which used only the teacher’s computer and a passive display.
Option #3 – Wireless Presentation System
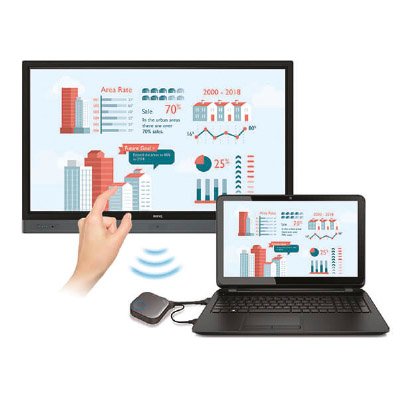
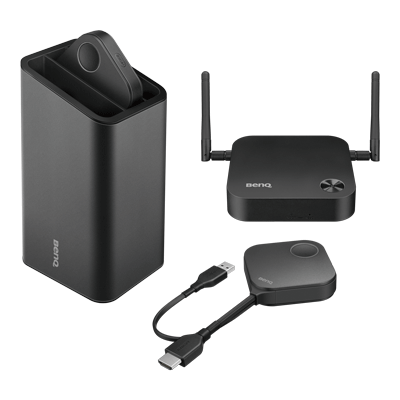
The third approach is to use a new wireless screen mirroring system like the InstaShow S WDC-20 to wirelessly connect your Windows notebook and interactive displays so you have exactly the same functionality as if you had connected them with a cable but with the untethered flexibility of an OPS. The touch back feature of the InstaShow S enables the screen to be used to wirelessly control your notebook from up to 40 feet away.
Besides enabling a more flexible room layout with a mobile display, this approach eliminates the cost of installing cables and purchasing expensive OPS computers. It also has the advantage of having up to four students share the interactive display screen at the same time from nearly any device, including Mac, Chromebook – or even a digital microscopes that can display their screen on the display. You don’t need any special software – or have to reconfigure your campus network to make it work.