Visit BenQ Education website for education solutions

What Is the Best Place to Mount a Golf Simulator Projector?

If you are thinking about turning a spare bedroom or your basement into Torrey Pines or Augusta National, then you will need a projector for your impact screen that is mounted in a safe place – but creates an immersive experience for indoor golf.   One of the most challenging questions is where to mount your projector so that it can:

  • Be protected from being hit by a golf club or golf ball
  • Fills up the entire screen whether it is large or small
  • Avoids players and bystanders casting shadows on the screen


There are three typical places that most people use to set up their golf simulator projector screens, and this article will help you evaluate which would be the best projector for your specific setup.   Let’s take a look at the three locations.

Ceiling Mount

The most popular place to mount a golf simulation projector is on the ceiling.  This creates a truly immersive experience just like in a commercial golf simulator.  For most home setups, it also makes it easy for your hitting area to be used as a home entertainment area to watch golf, movies, or let your kids play X-Box on the big screen.


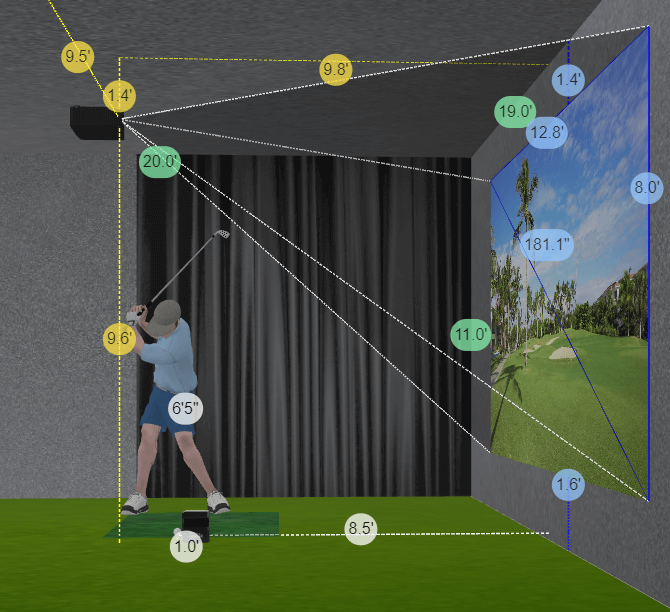
The best projectors for ceiling mounts in the home are short throw projectors, which can be mounted above and behind the hitting area without the risk of a golfer casting a shadow on the screen.   You can determine how far back the projector needs to be using a tool like the BenQ Golf Sim planning tool, where you can input the dimensions of your impact screen and the tool will show you how far back the projector needs to be, as well as other elements such as where your launch monitor needs to be placed – and other important dimensions.  Here is an example using a LH600ST projector with a tall golfer for a small space.   

Golf Sim Planner

Since most people have never mounted a projector before, there are some handy DYI videos available for those who want to do it themselves.  This video can walk you through all the steps needed, including handy tips for how to ensure your projector is correctly centered when mounting your golf simulator on the ceiling.

Floor Mounted Enclosures

The second most popular way of setting up a golf simulator is to put it inside an enclosure on the floor in front of the hitting area.  This type of setup requires a projector with a shorter throw ratio to be able to properly fill the screen.  The enclosure is designed to deflect the golf ball away from the projector on a missed shot, and enables you to run the cables under the mat to the computer or touchscreen.  


The main drawback is that the projector mount is in front of the golfer – so you risk hitting it with your shot and knocking it out of alignment. This also introduces a tripping hazard.  The other drawback is that the projector has to be positioned in the exact right spot, since the lenses on the models used don’t have optical lens shift like on many ceiling mounted units.  The two most popular models for this type of setup are the $600 BenQ MX825ST that has a native 4:3 aspect ratio, and the laser powered LH820ST projector that has generated some fantastic reviews from golf simulator review sites.

Cart Mounted Projectors

If you don’t want to put the unit on the ceiling or the floor, you can use an AV cart to place the projector to the side of the hitting area.   This is a popular approach with “Sim-in-a-Box” packages since it doesn’t require any mounting.  To place the cart behind and beside the hitting area, you can use either a short throw projector like the LU935ST, or a less expensive model such as the $1699 LU710 where the cart is further back. 


The biggest problem with carts is that they have the highest risk of a shadow, especially if you have both right and left handed golfers hitting on both sides of the hitting area.  You can also get alignment issues if the cart is accidently bumped or moved.

Aspect Ratio and Lens Shift

Unlike a TV – you can set up a golf simulator in a variety of aspect ratios.  For small spaces, you might want to use a more narrow 1:1 setup that is ideal for a narrow garage or basement, or go a bit wider with a 4:3 or 16:10 setup which allows more width for the same height of your impact screen.   If you want a narrower display like this, look for a projector with a Screen Fill function can enable you to change the aspect ratio of your projector with a simple press on the remote – without having to fiddle with your computer’s graphics card.  The other handy tool is lens shift.  This enables you to move the projector side to side without tilting the projector.  Most of the BenQ golf sim models come with digital lens shift, and the higher end models have optical lens shift as well.  If you can use the golf simulation planning tool to optimize your mounting locations, these tools, as well as corner fit – can make mounting your projector yourself a lot easier.

Which Projector Is Right for Me?


BenQ MX825STH

BenQ LW600ST

BenQ LH600ST

BenQ LH820ST

BenQ LU710

BenQ LK936ST


Brightness

3500 Lumens

BenQ LW600ST

2800 Lumens

2500 Lumens

3800 Lumens

4000 Lumen

5100 Lumen


Resolution

XGA

BenQ LW600ST

WXGA

1080P

1080P

Widescreen

WUXGA

Widescreen

4K UHD


Screen Fill Function

No

BenQ LW600ST

Yes

Yes

Yes

No

No


Lamp Type

Lamp

BenQ LW600ST

4LED

4LED

Laser

Laser

Laser


Est. Street Price

$609

BenQ LW600ST

$899

$1099

$1899

$1699

$4899

Want to Talk to a Golf Simulator Projector Expert?

BenQ has trained staff to help you find the perfect golf simulator projector – within your room size and budget. To help you make the best decision, you can reach out to one of our experts to set up anything from a chat to a complete online demo, to help you find the right projector for your needs.